Creating an online course in TalentLMS is easy.
So easy, in fact, that this walkthrough covers everything you need to know on the subject.
Are you ready to create your first online course in minutes? You will be once you follow these 8 simple steps.
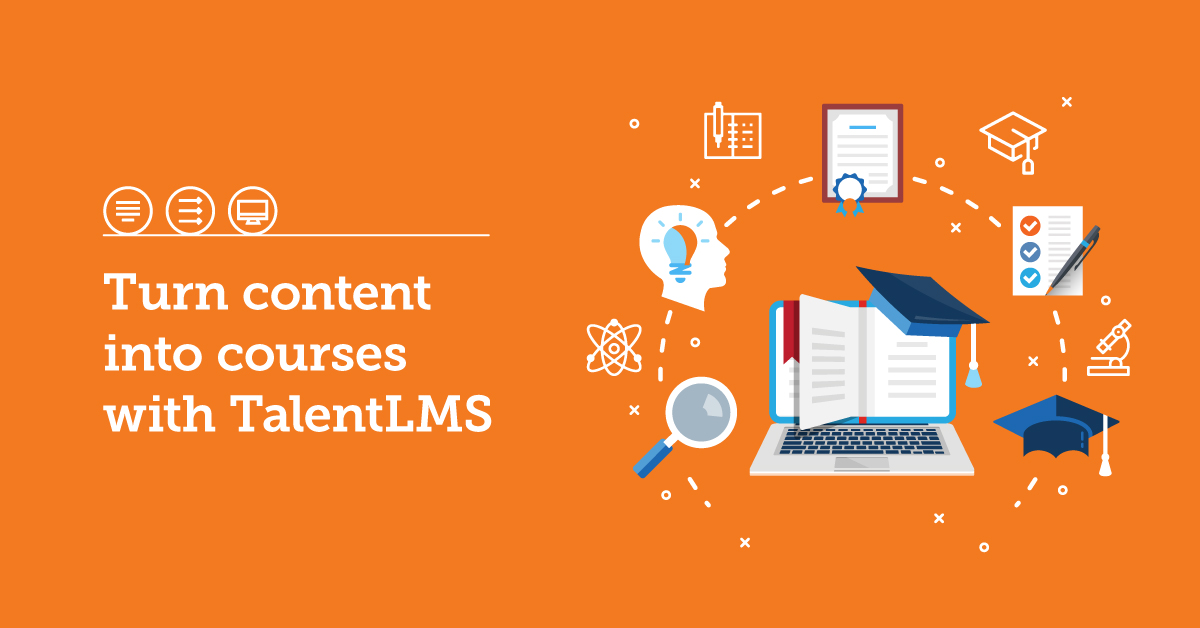
Looking for an eLearning platform to boost online training?
Create your first online course in no time with TalentLMS.
The training platform that users consistently rank #1.
Step #1: Log in
Use your username and password to log into your TalentLMS learning hub.
(Note: you need an Administrator or Instructor account to create a course)
Step #2: Go to the “Αdd Course” page
While the steps to create online courses are the same for all TalentLMS account types, the first page you’ll see upon login will be different depending on whether you are logged in as an Administrator or an Instructor.
Administrator view:
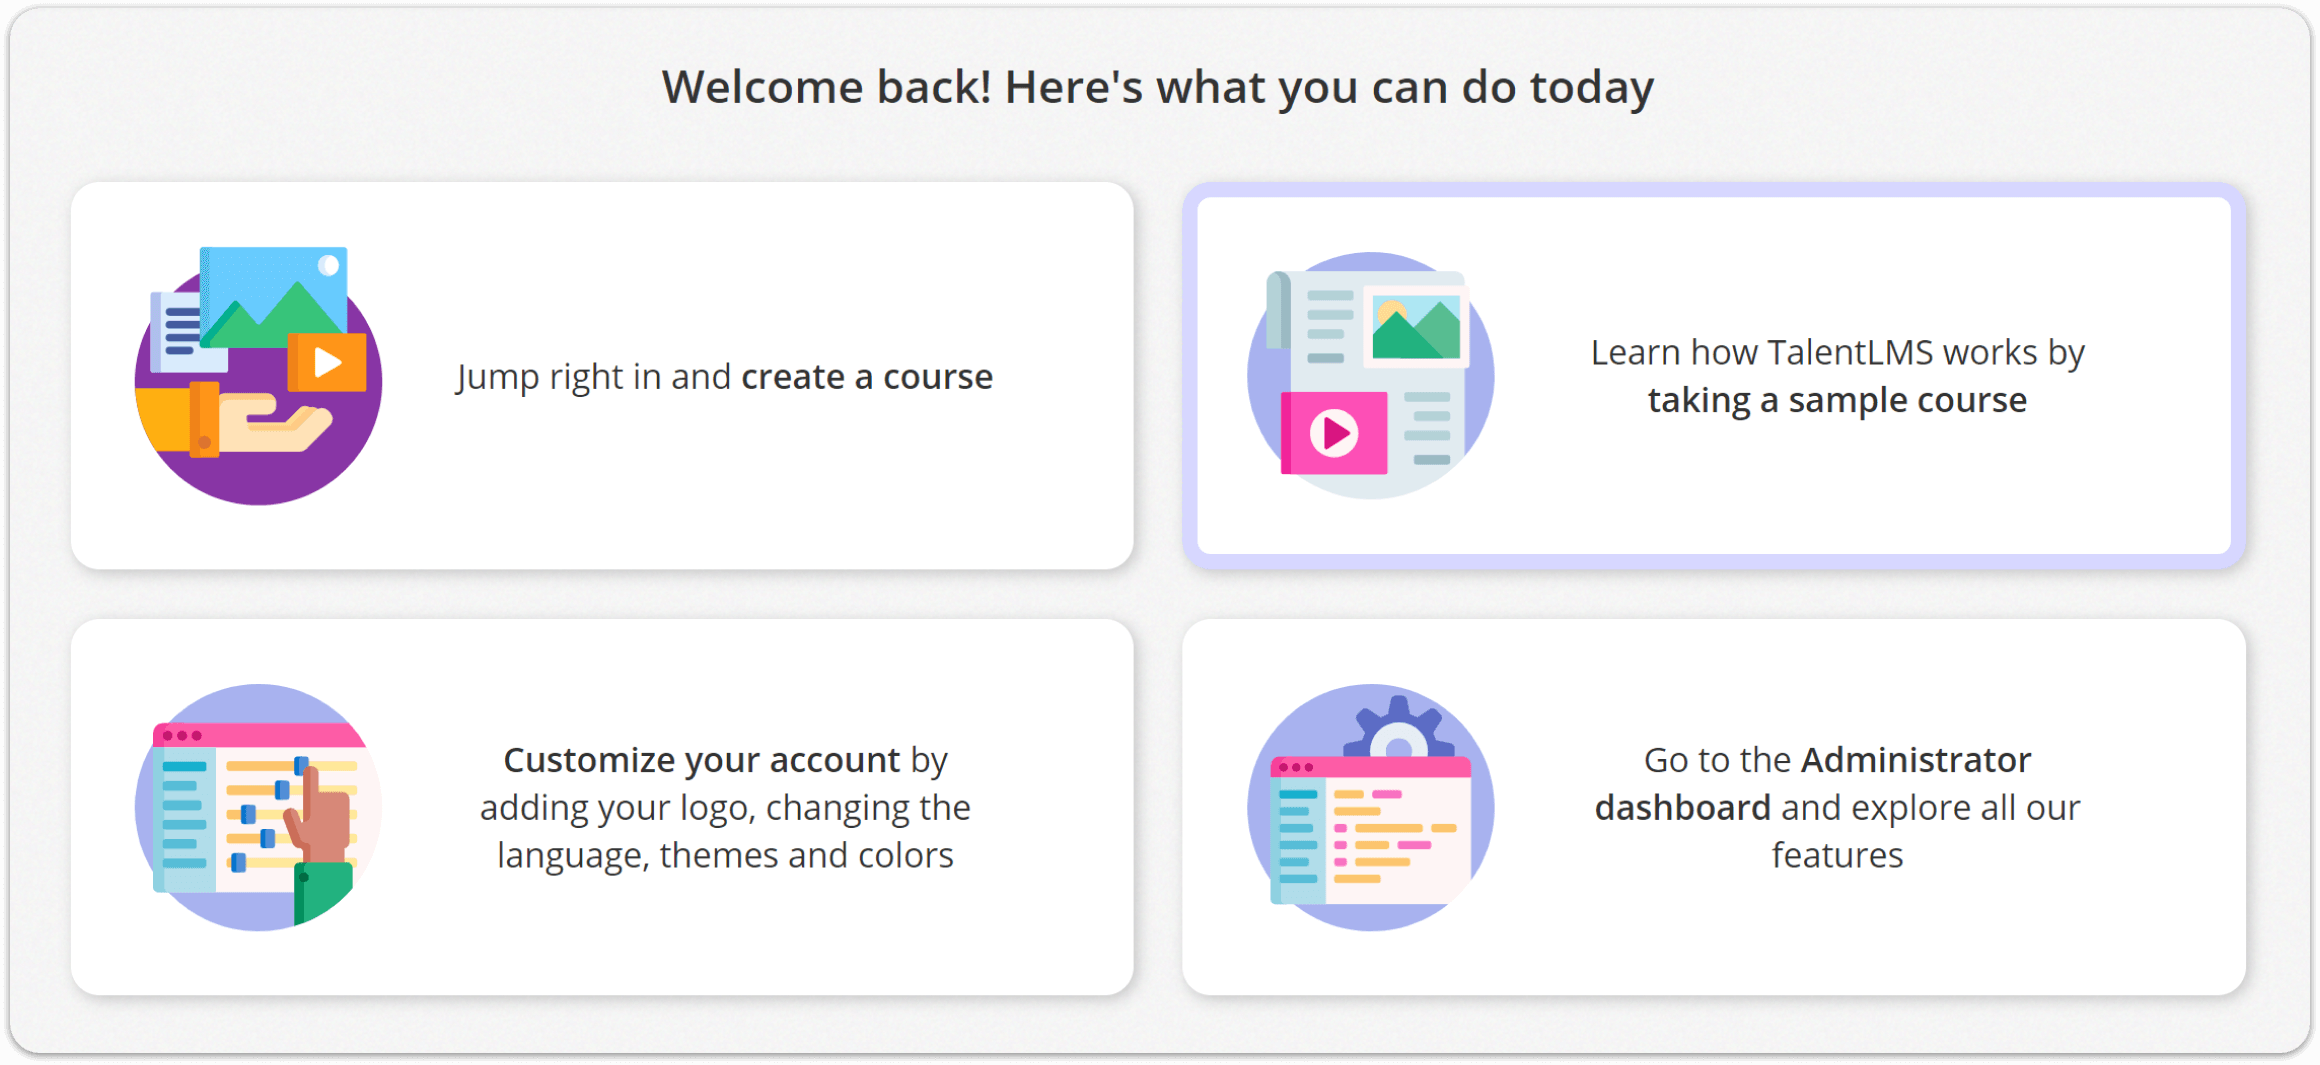
If this is the first time you’re logging in as an Administrator, you’ll see a splash page with three options:
- Directly upload a new course
- View a sample course
- Or visit the admin page.
Forget the first two for now and click “Visit your Admin page.”
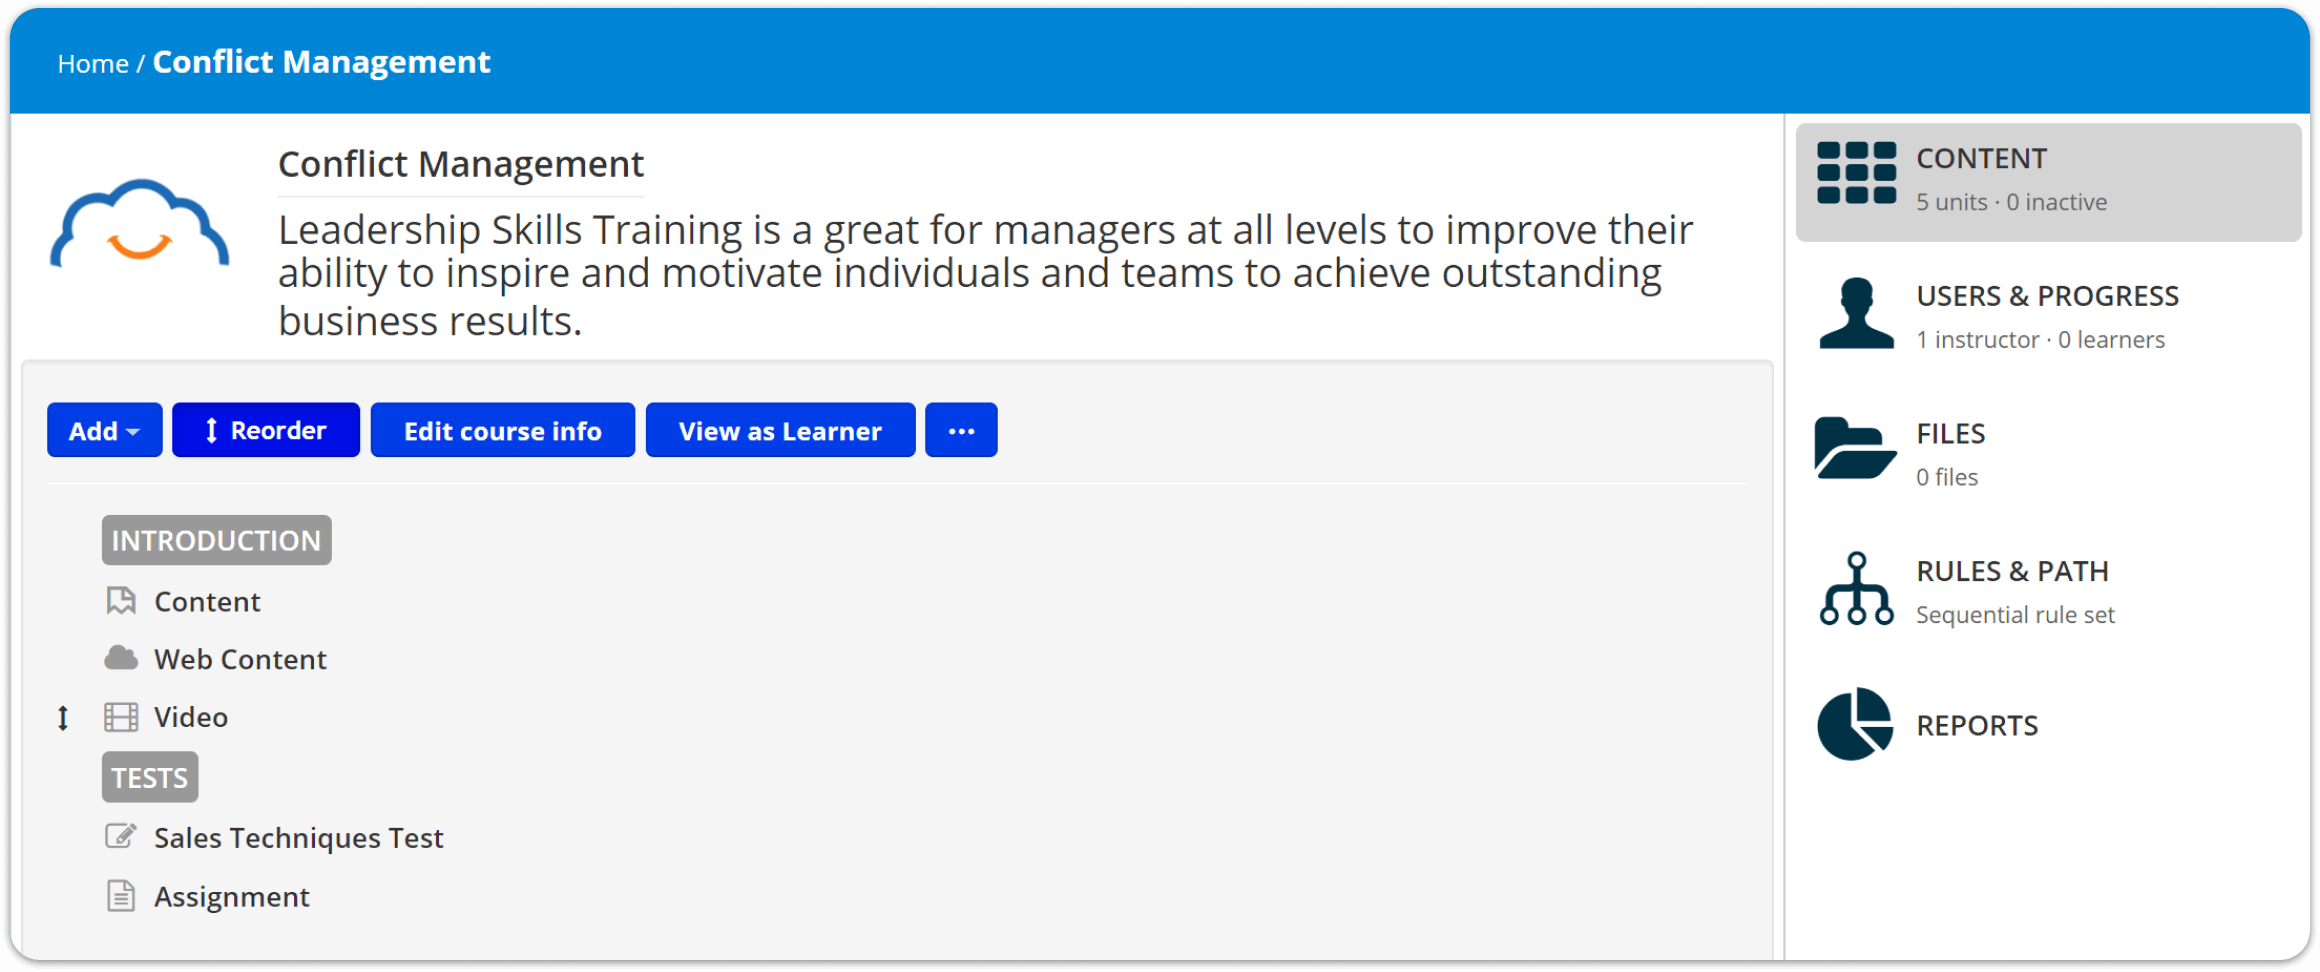
This takes you to the main administrative page. From there, click “Add course” to get started.
Instructor view:
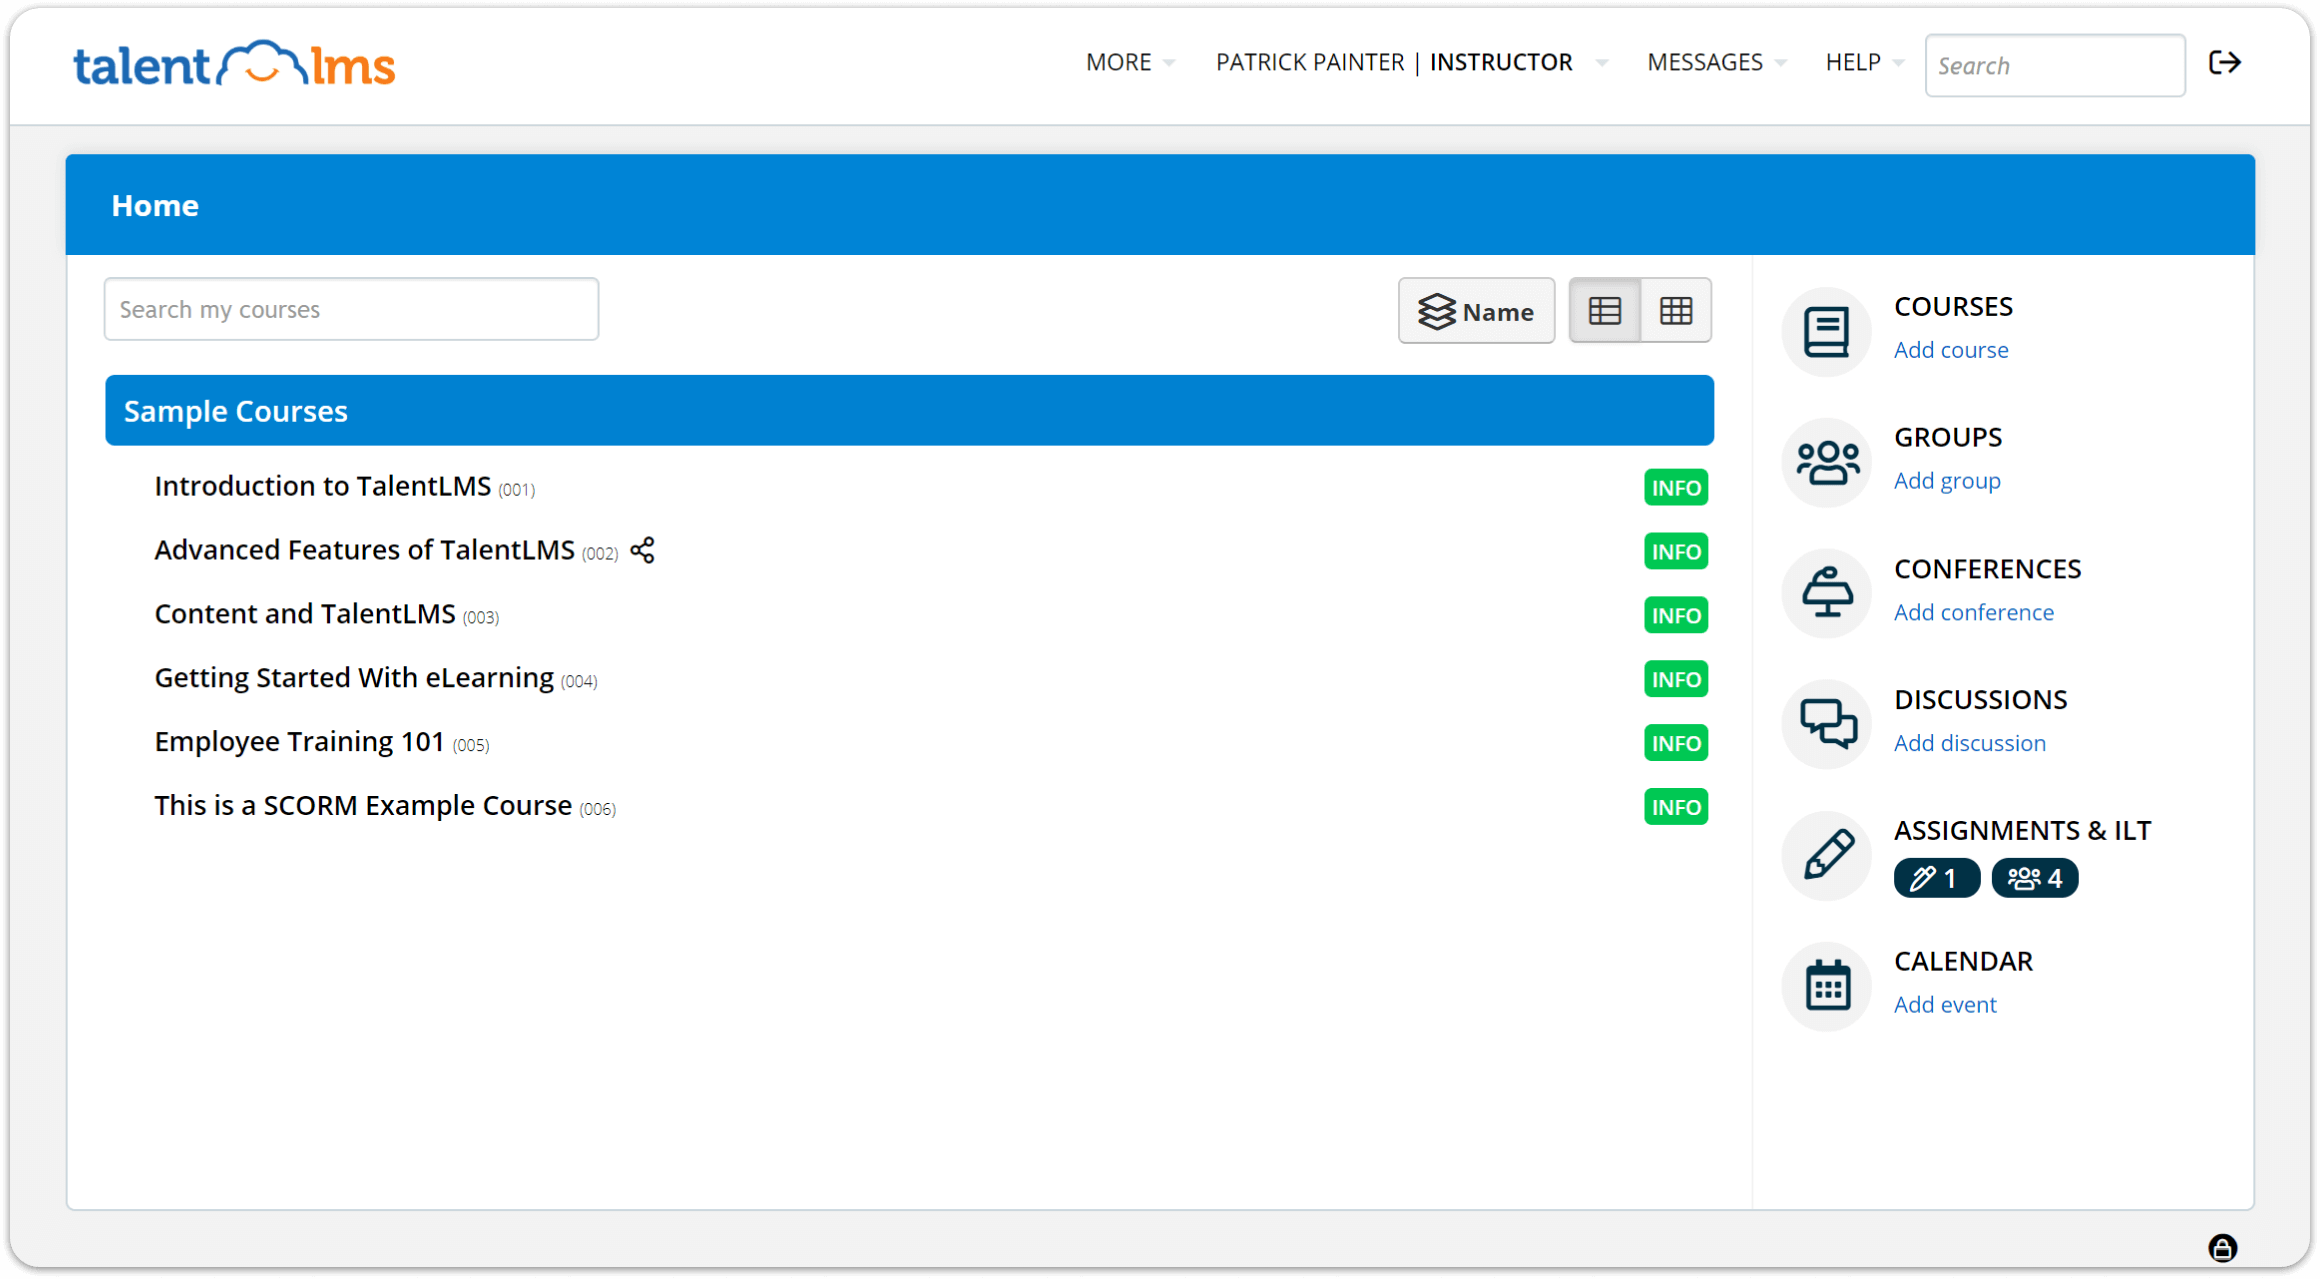
If this is your first time logging in as an Instructor, you’ll notice that, by default, some courses are already in your account. Those are sample courses the TalentLMS has created to help you get started.
To create your first new course, go to the right side of your dashboard, find Courses, and click “Add course.”
Step #3: Name and configure your new course
Now, you should be on the “Add Course” page. From here, you can start building your online course and adding your content.
First, though, you need to give your eLearning course a name and configure a few of its options.
The available fields are:
- The course name
- The category the course belongs to — categories are managed by Administrators, and Instructors can only choose from one of them from the dropdown menu
- A short course description
- The option to activate or deactivate a course (it’s active by default)
- The ability to hide the course from the Course Catalog
- A short course code
- The course’s price (applicable to commercial training scenarios only)
- Time Limit (the number of days a learner has to complete the course)
- The ability to only allow users that have reached a certain level to take the course — yes, users can level up by completing courses
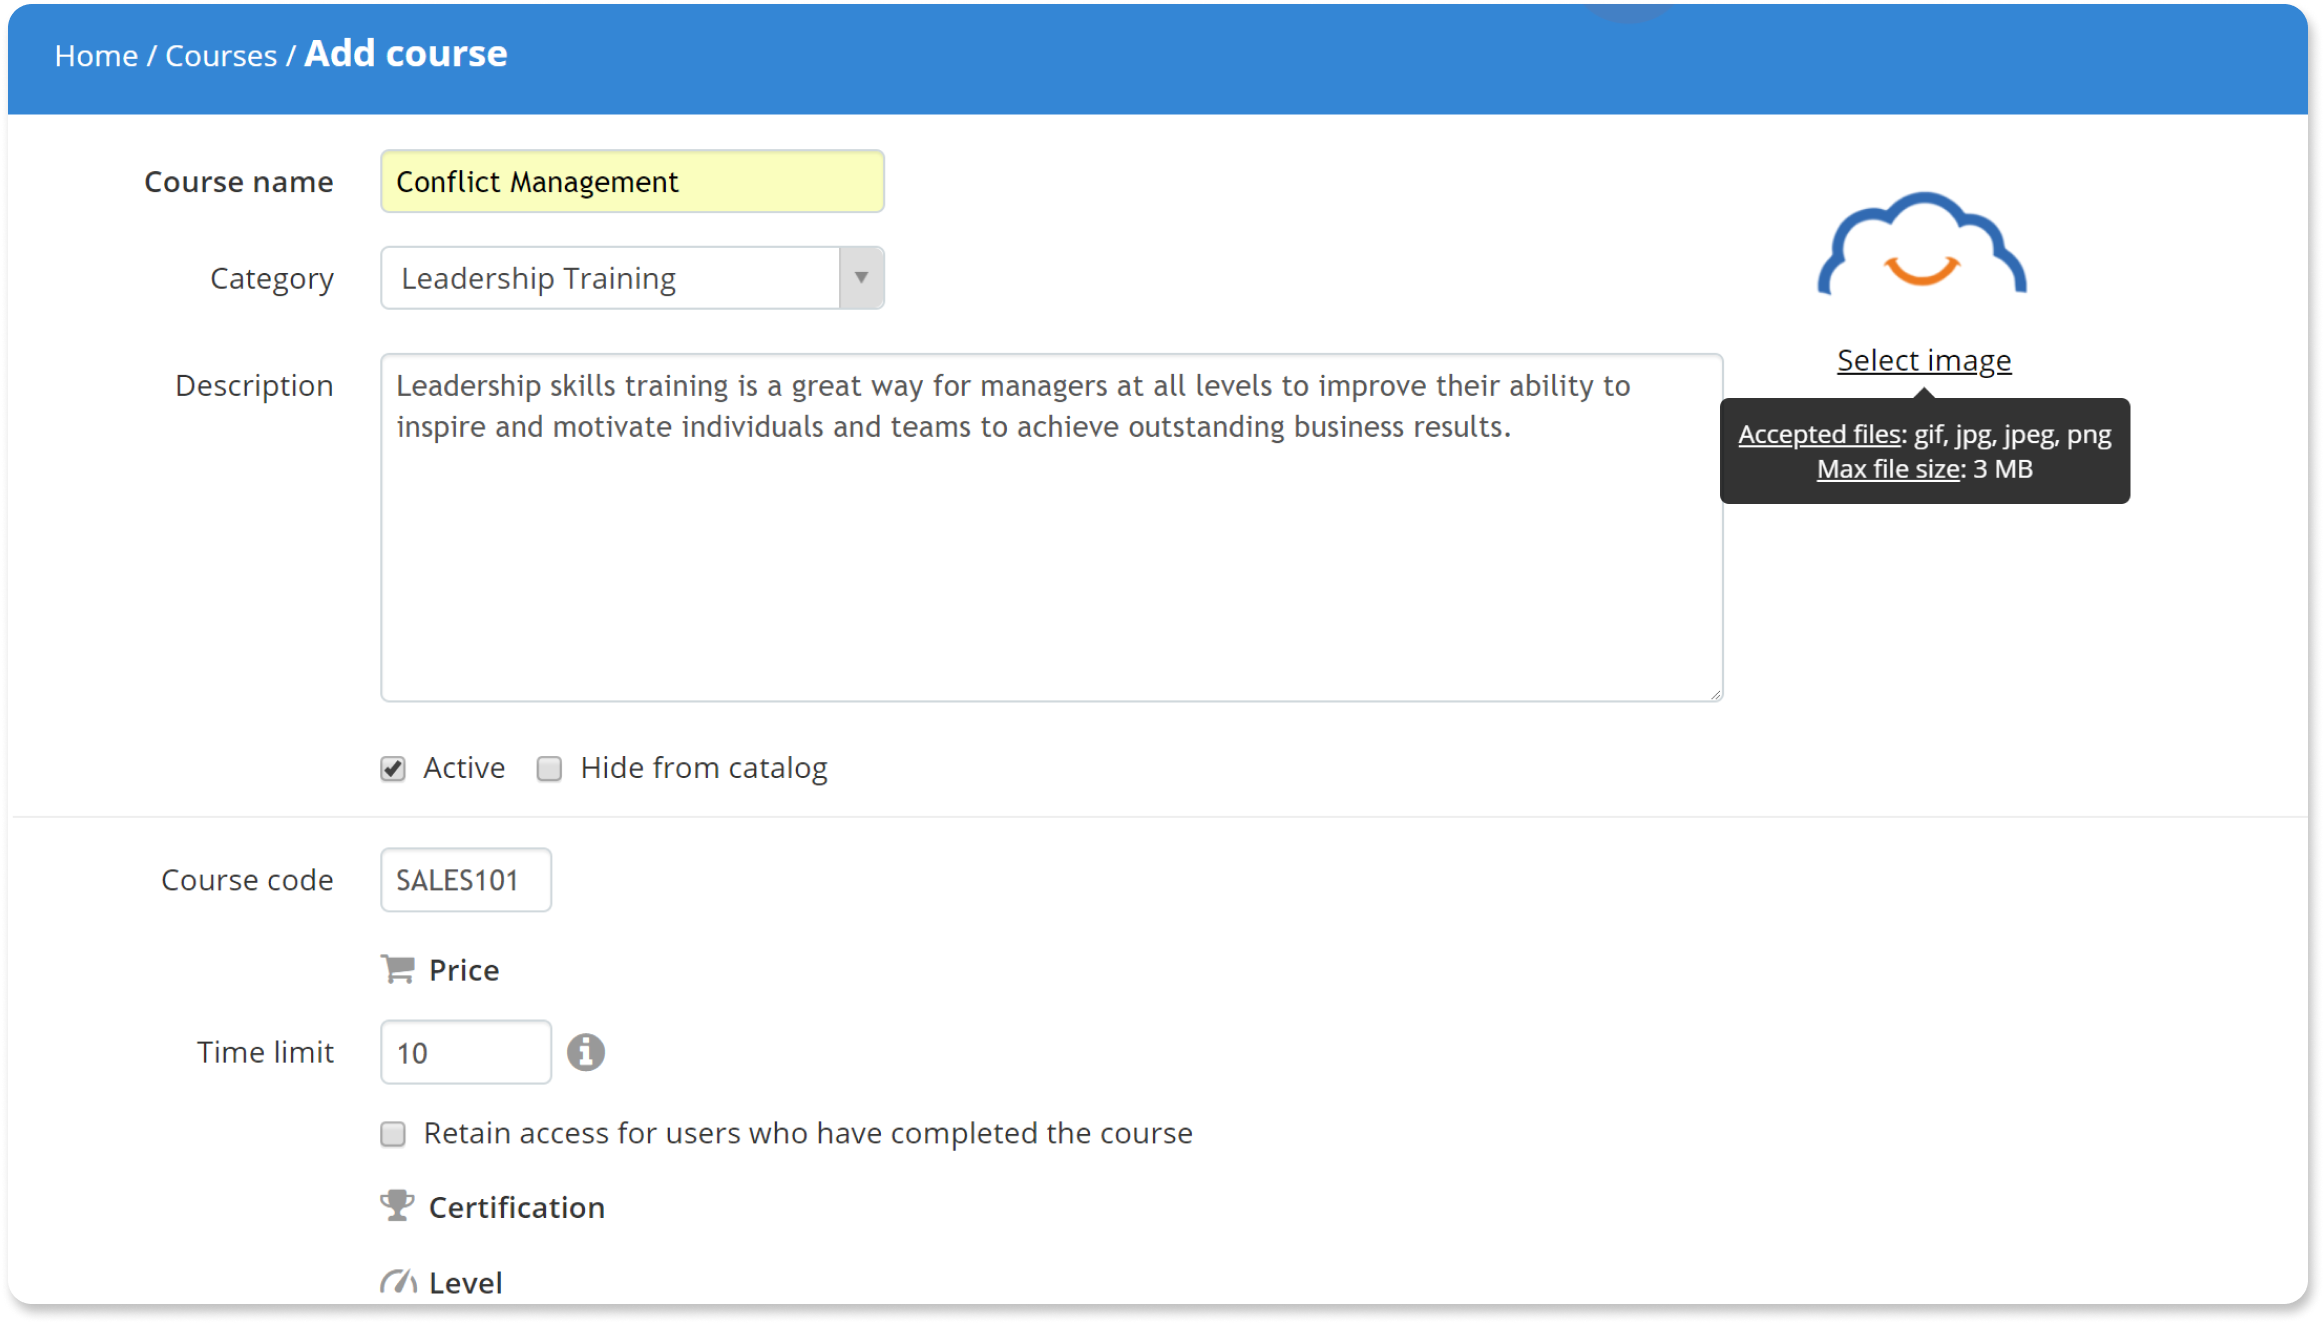
To upload a custom thumbnail, click “Select image.”
Last but not least, there are the certification-related options. You can choose a theme for the certificate (which also activates it), set an optional auto-expiration period, and select whether to automatically re-assign the course to a user whose certificate expired.
Note that aside from the course’s name, all other fields are optional.
After you’ve finished configuring your course, select “Save course and add content.”

(You can come back and re-edit the course’s info anytime you want)
Step #4: Add your content
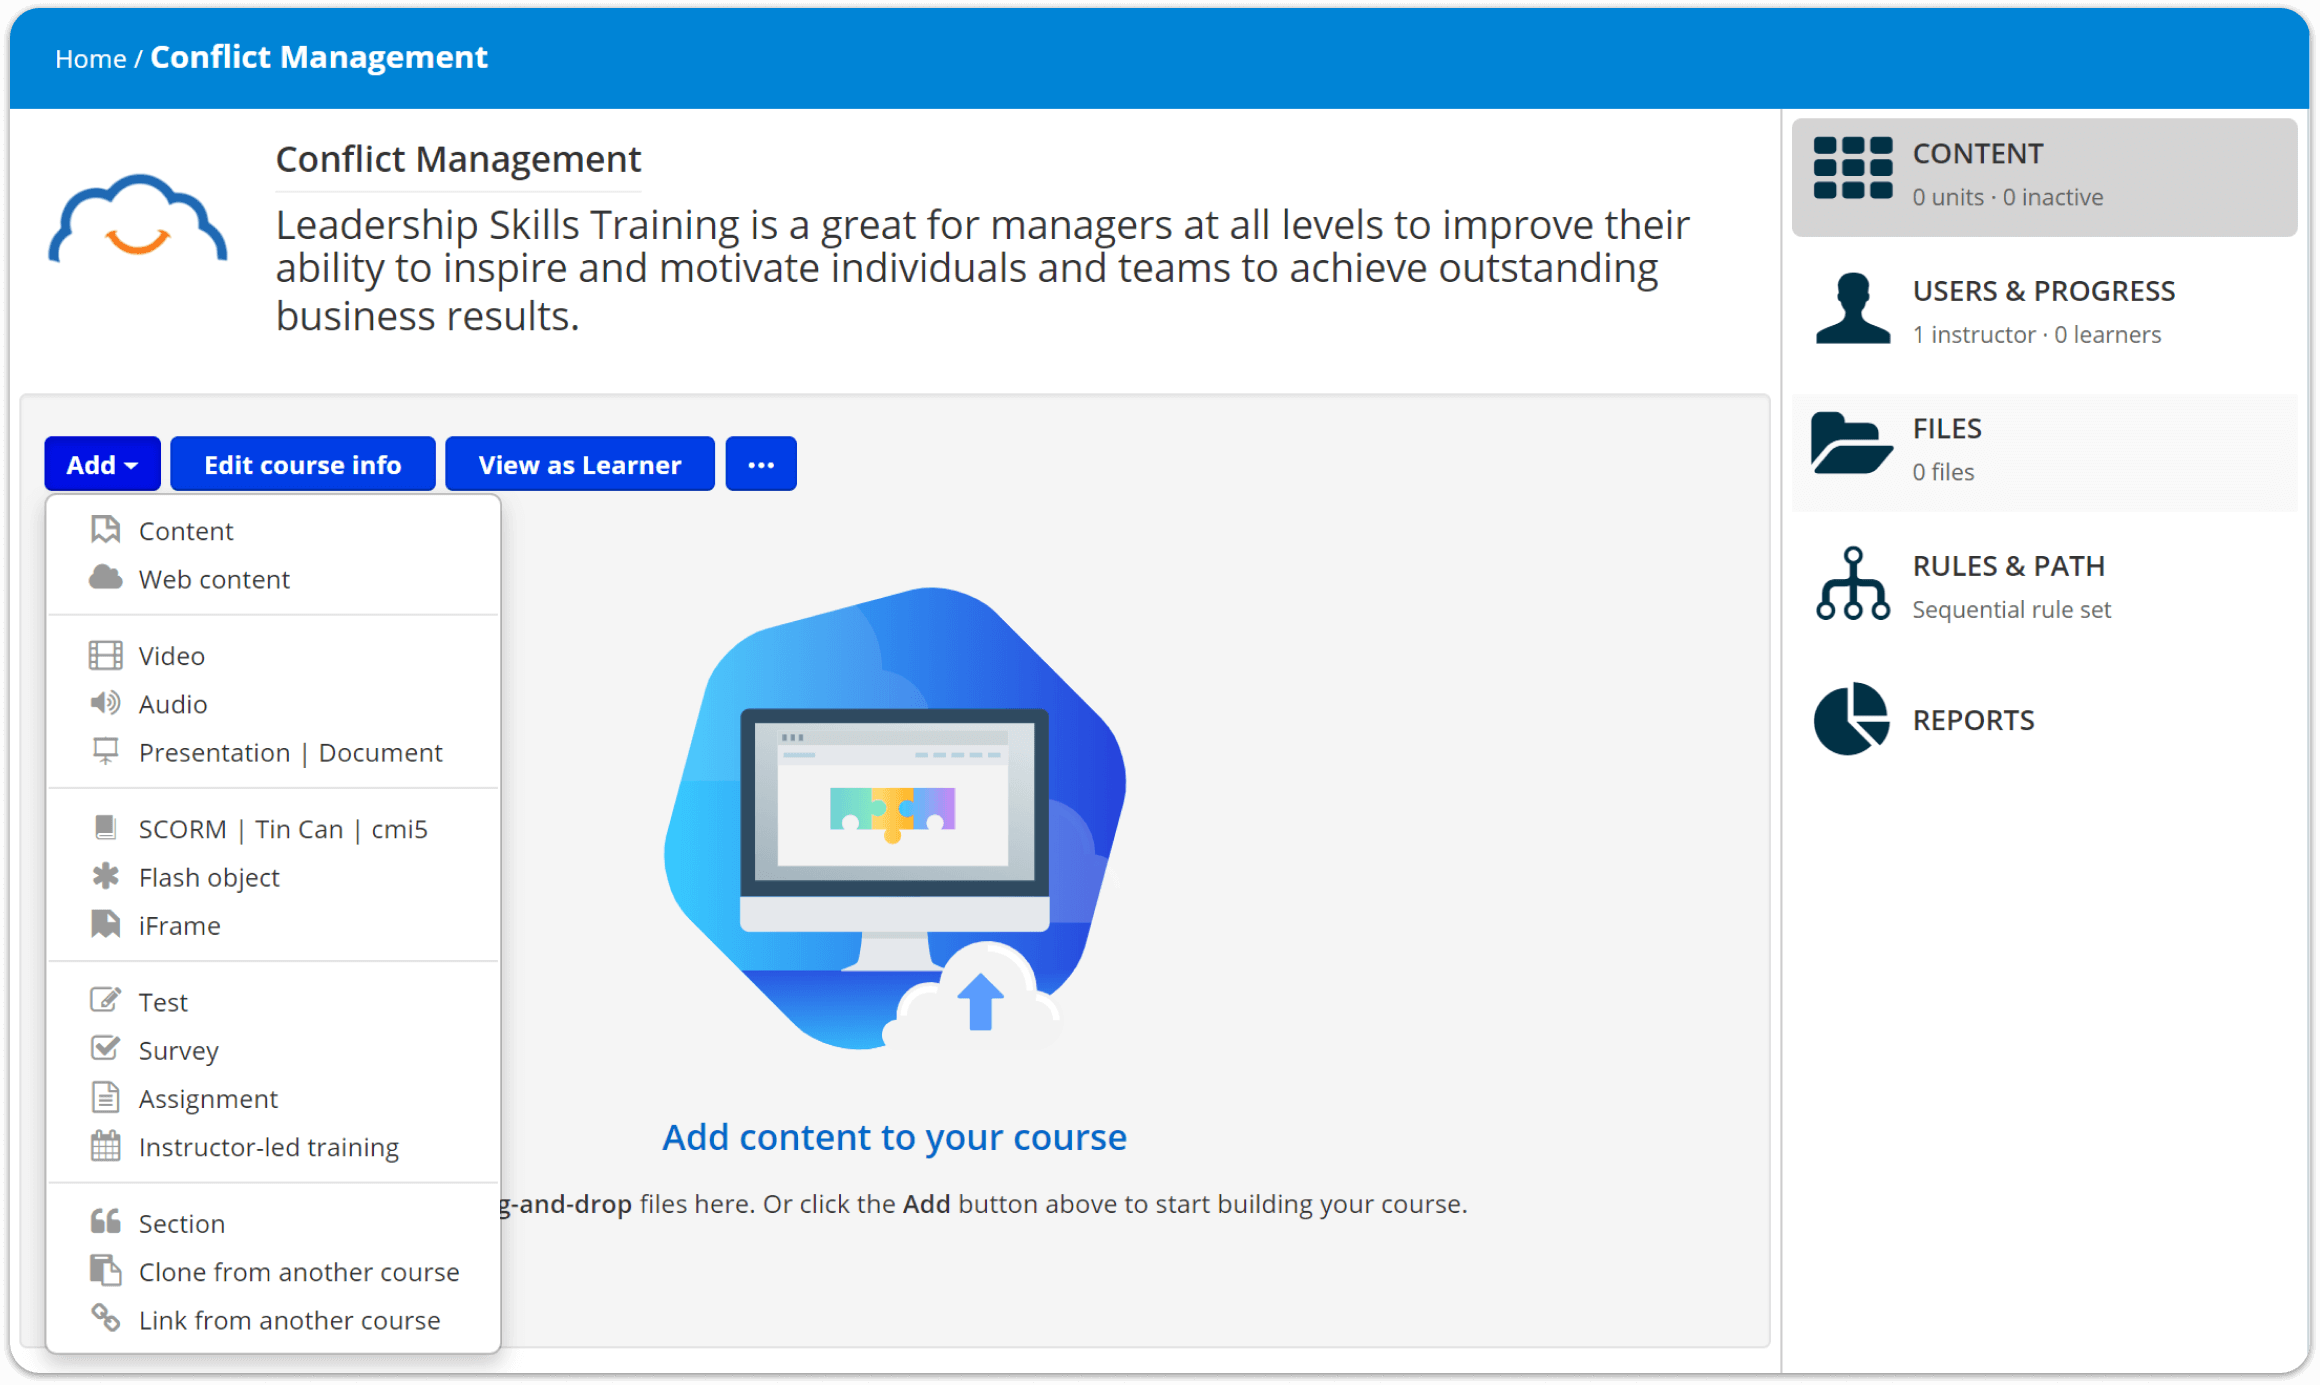
Click “Add” and you’ll see a dropdown list of all the types of content units you can add.
Content
The plainly named “Add Content” form lets you add the most basic and commonly used unit type: rich text content.
You can choose the font, set the size, color, variant, and justification. You can also add tables, images, and links.
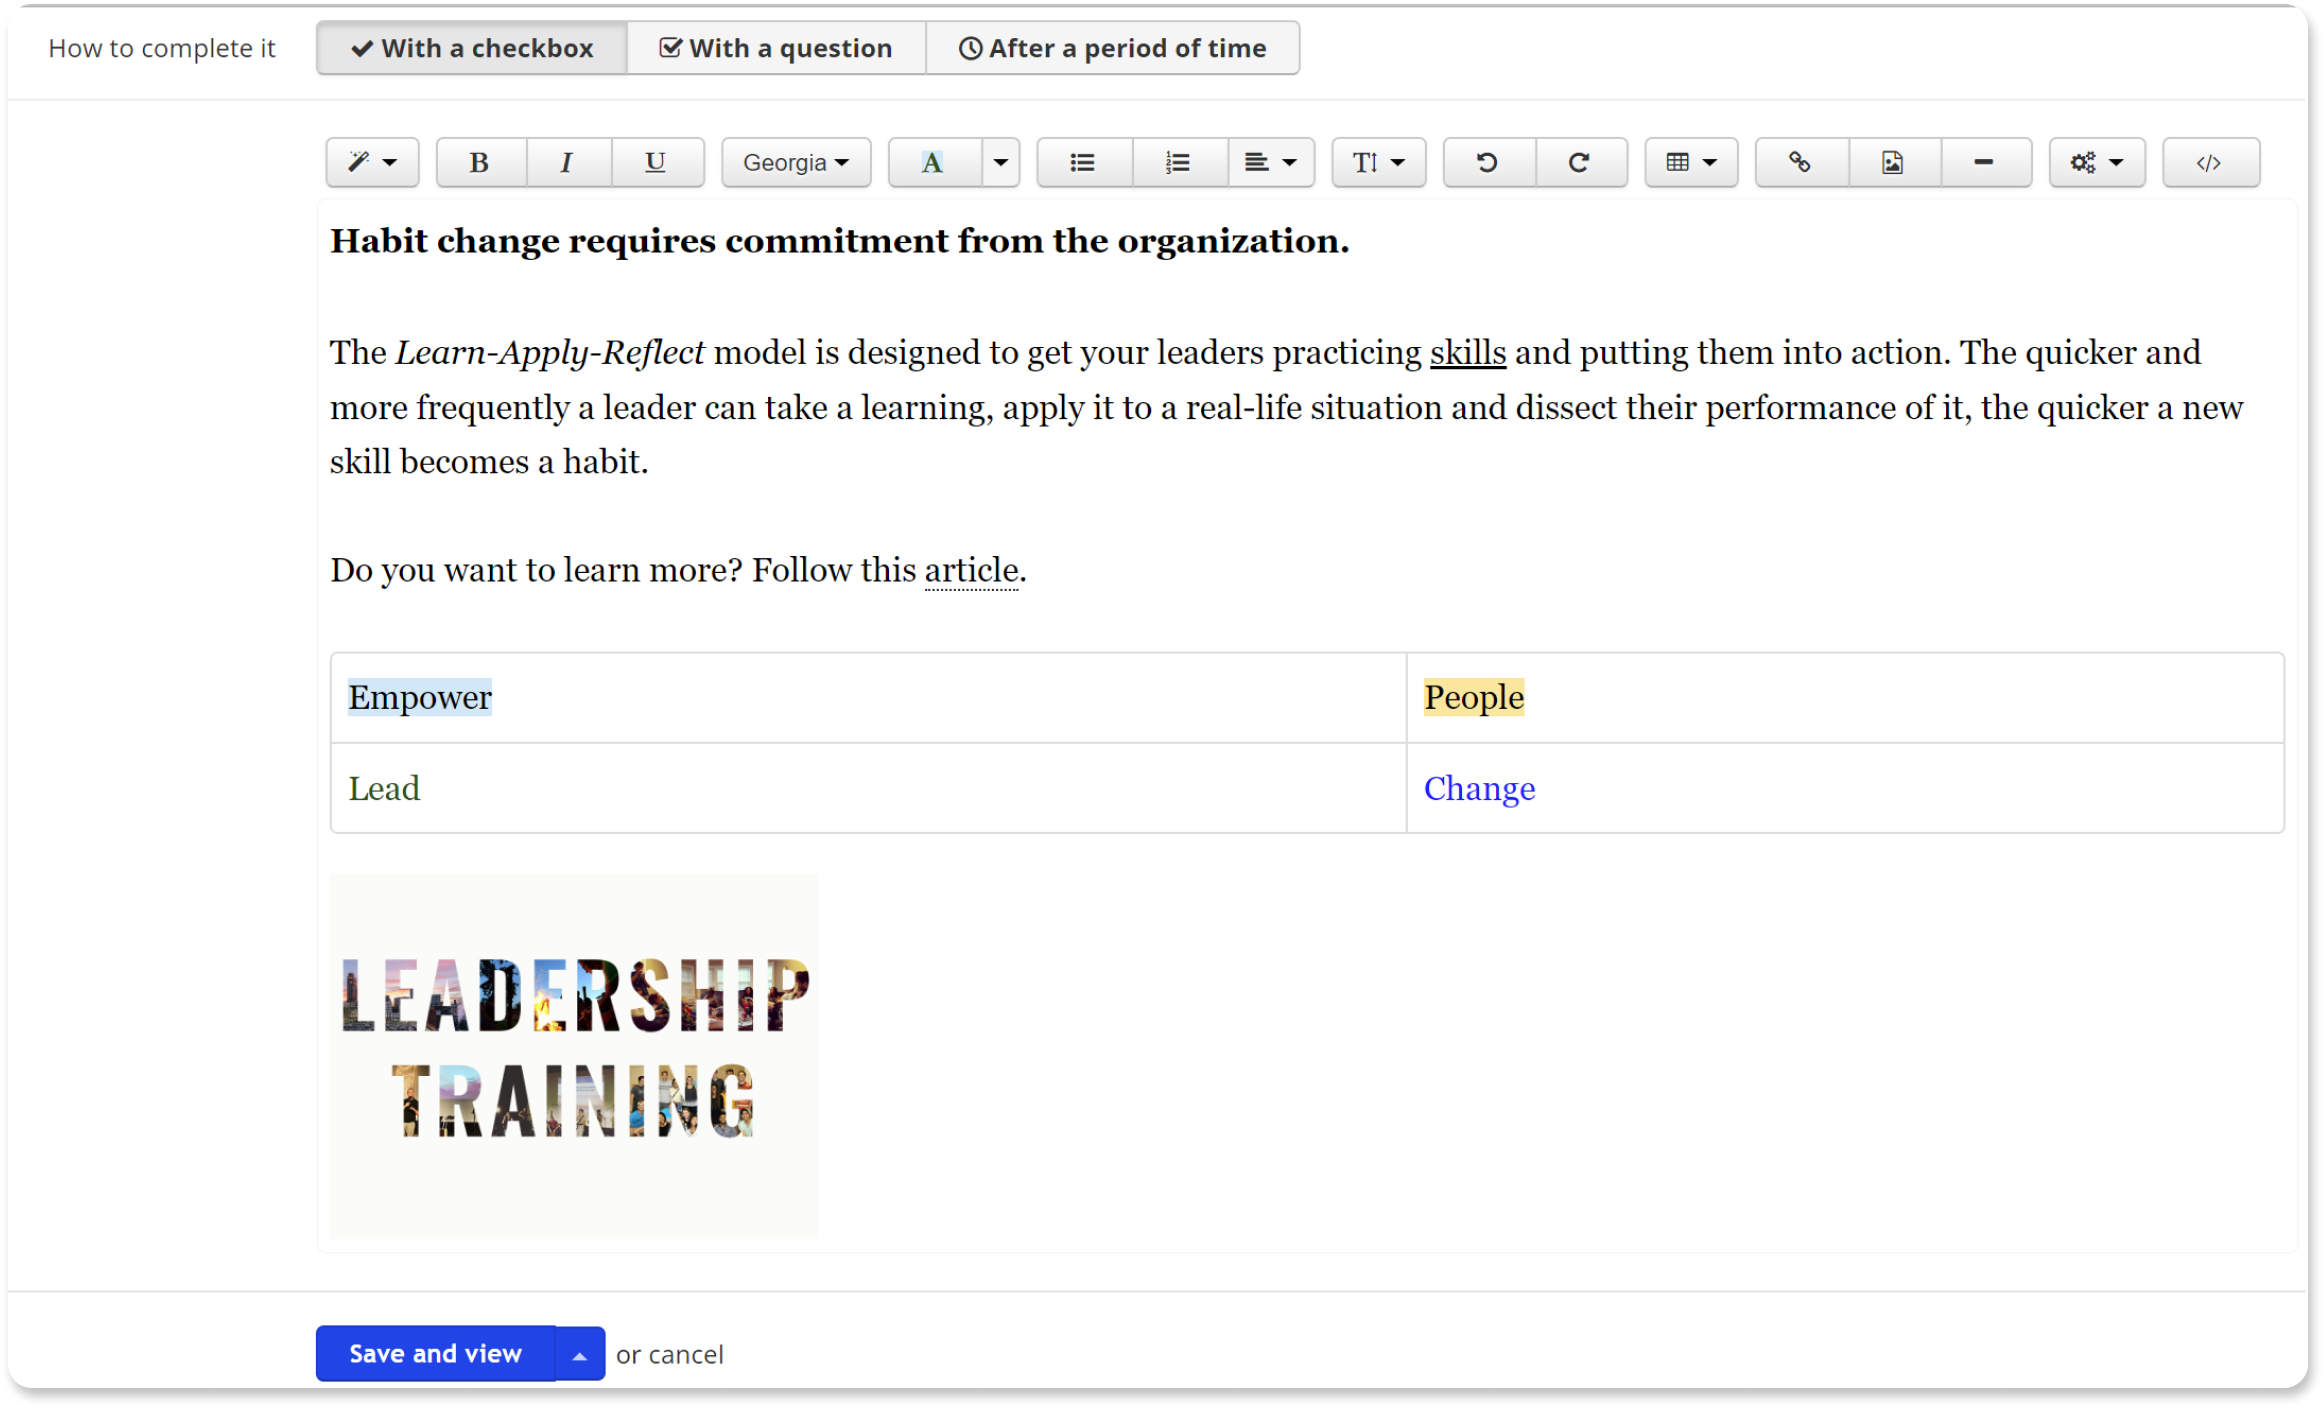
In this, and several other content types, you can also set criteria for the unit’s completion:
- After the learner marked it as such
- After they’ve successfully answered a question
- Automatically, after they’ve devoted the chosen time studying it
Web content
The “Add Web content” form lets you embed material from popular websites by copying and pasting a URL address.
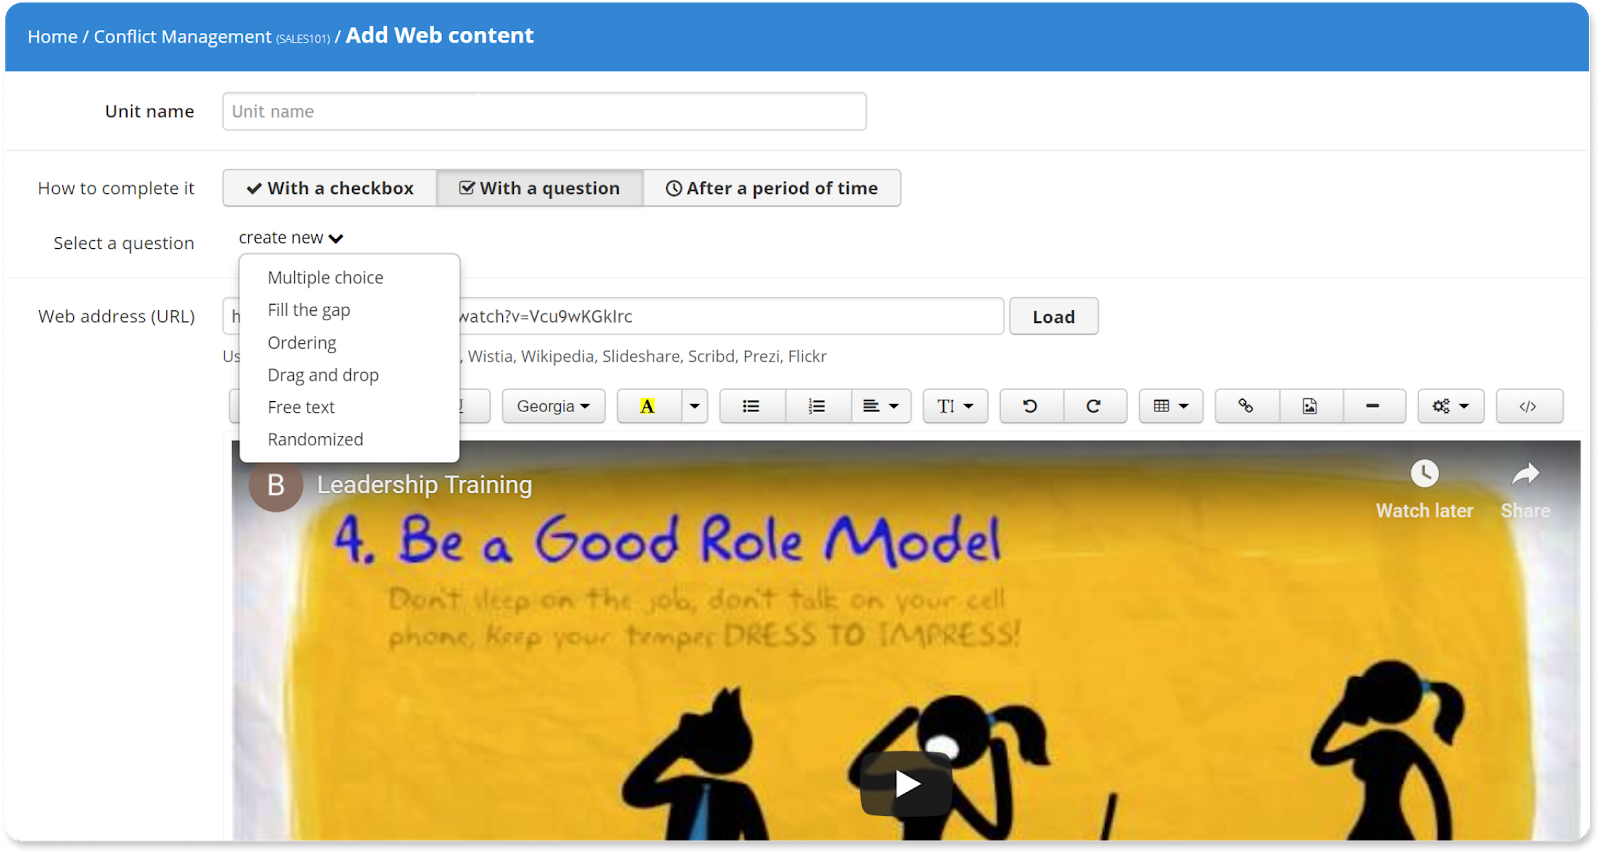
TalentLMS supports embedded web content from Youtube, Vimeo, Wistia, Wikipedia, Slideshare, Scribd, Prezi, and Flickr.
Video
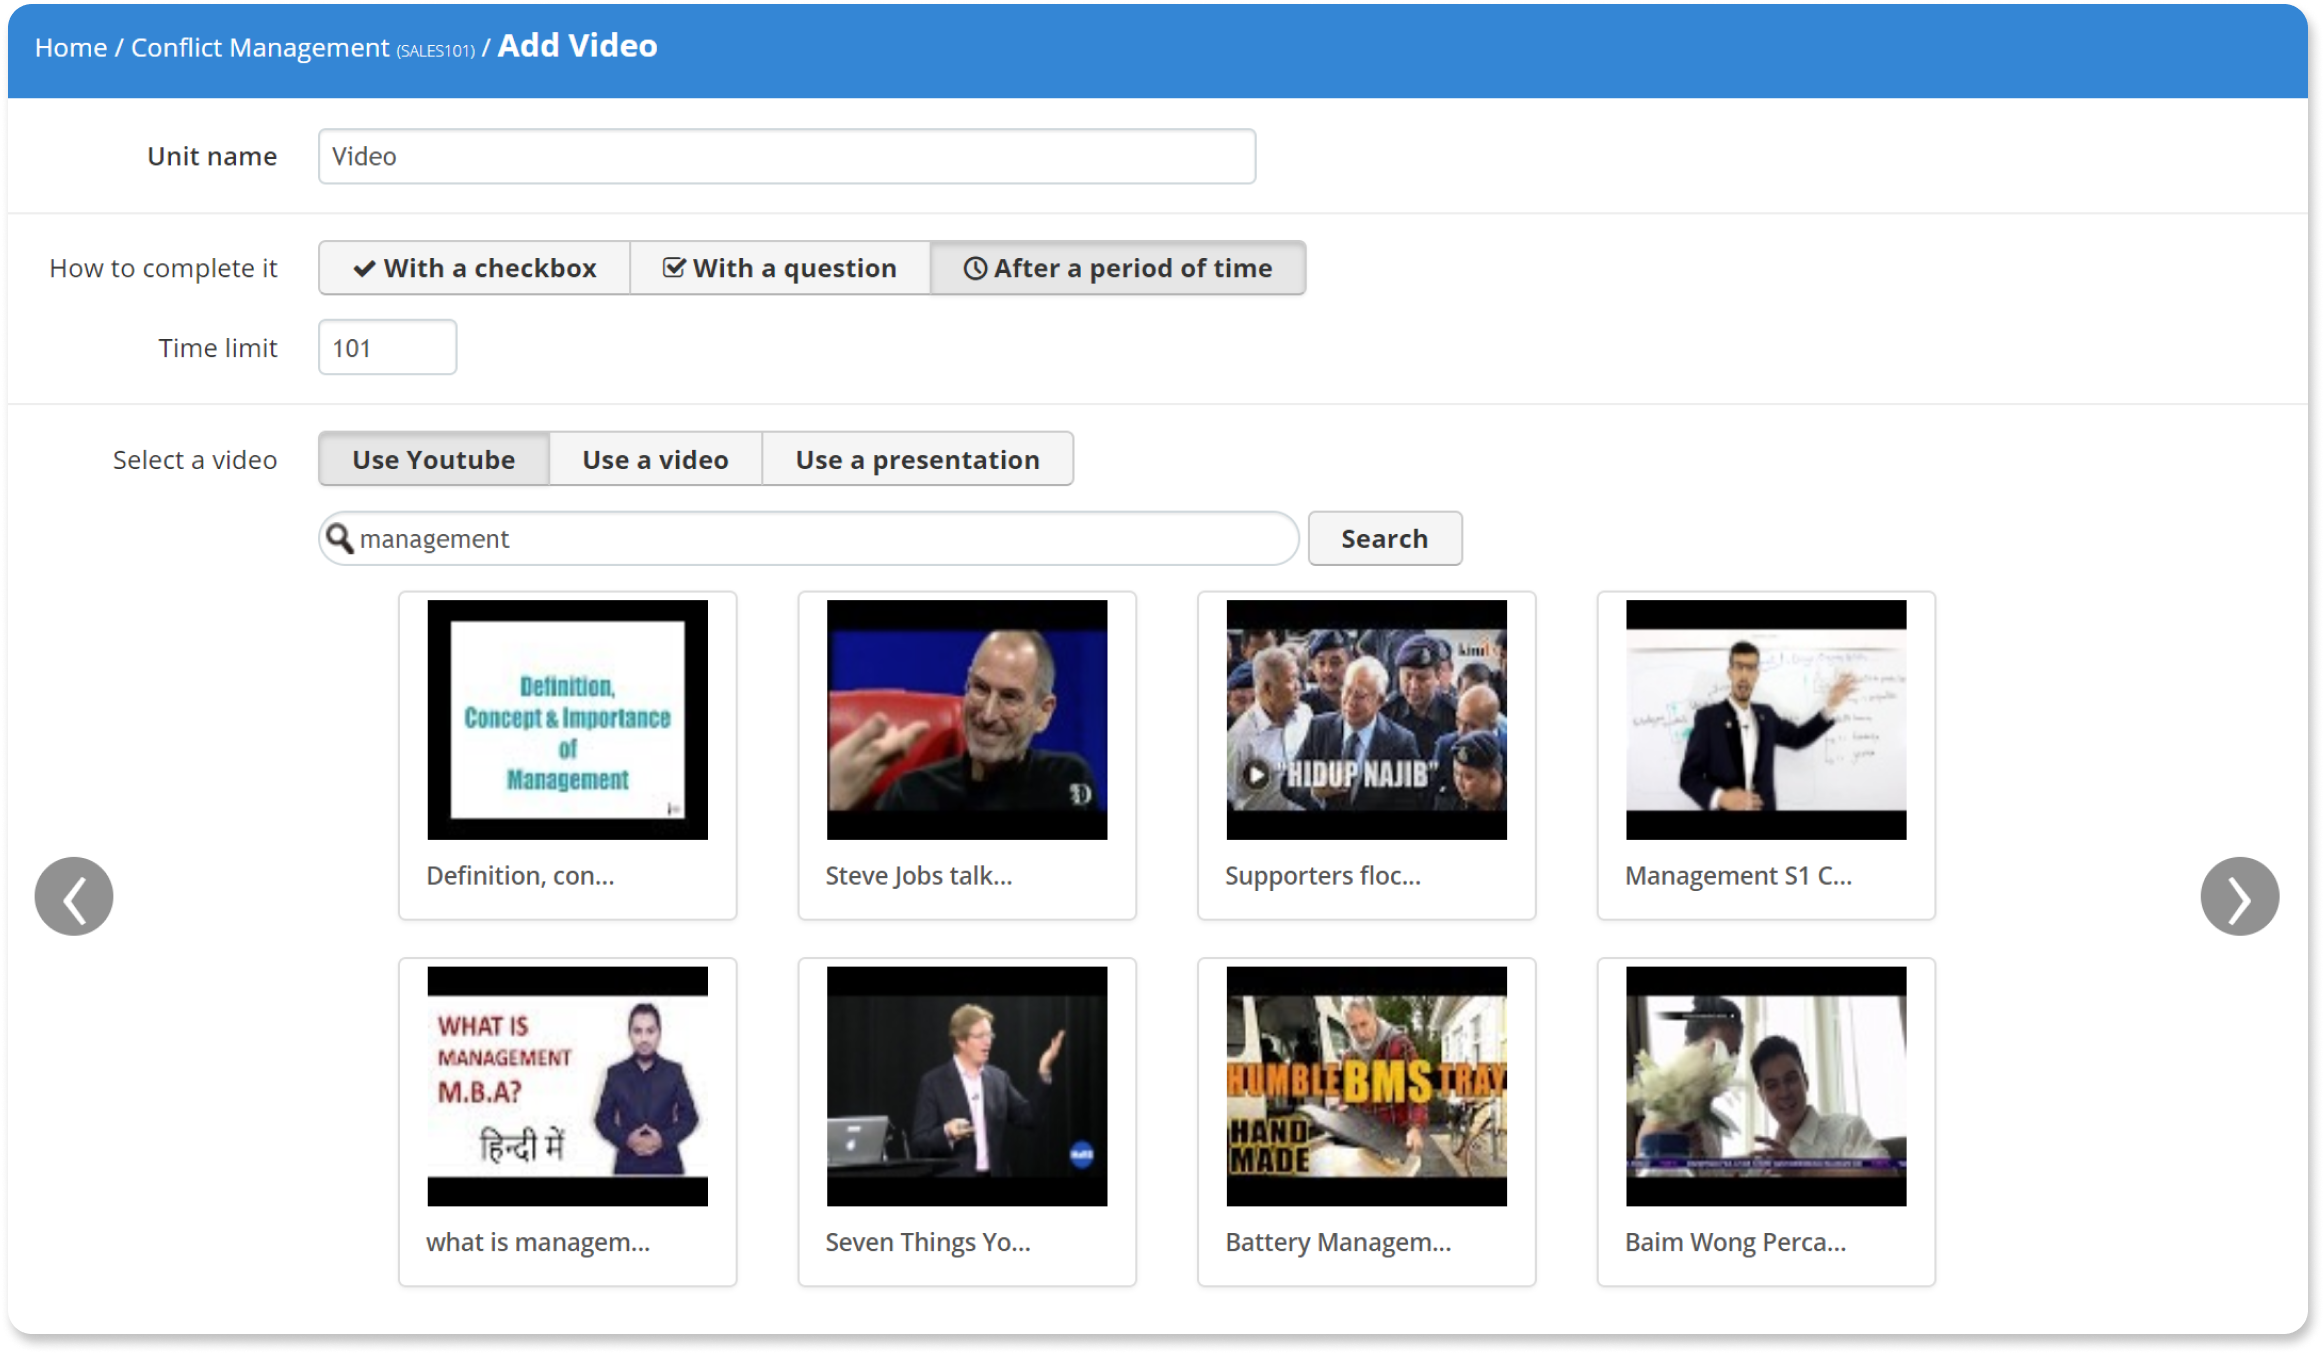
With “Add Video” you can embed videos in your course.
And TalentLMS gives you five options for how to do this. You can:
- Directly upload a video,
- Record a video through your webcam (no software required),
- Paste a YouTube video URL
- Type a search term and pick a YouTube video from the results page
- Upload a PowerPoint presentation and have it automatically converted into a video.
Audio
The “Add Audio” form lets you embed audio content into your course.
There are two ways to do this:
- Directly upload an audio file (mp3, wav, etc.)
- Record audio through your laptop’s microphone, a headset, or any other kind of audio recording device you have available (no special software required)
Presentation | Document
The “Add Presentation | Document” page lets you upload and embed all major business file formats into your course. You can add PowerPoint (.ppt, .pptx), MS Word (.doc, .docx), Excel (.xls, .xlsx), and Adobe PDF (.pdf) files. TalentLMS will automatically convert the files to a format appropriate for your eLearning course.
Since most content you create and use will probably be in one of these formats, these content types help you take advantage of your existing documents, letting you use them as learning content.
SCORM | xAPI | cmi5
This form lets you add lesson units in the eLearning industry-standard SCORM, xAPI, and cmi5 formats.
This content type is particularly useful for transferring content from your previously used LMS. But it also helps you add content created in third-party tools (e.g. Articulate Storyline), as well as import commercial eLearning courses.
iFrame
“Add iFrame” lets you include a full external webpage inside your unit. All you’ll need to do is enter the desired URL, and select whether you want your iFrame to show embedded inside your unit or in a popup window.
Test
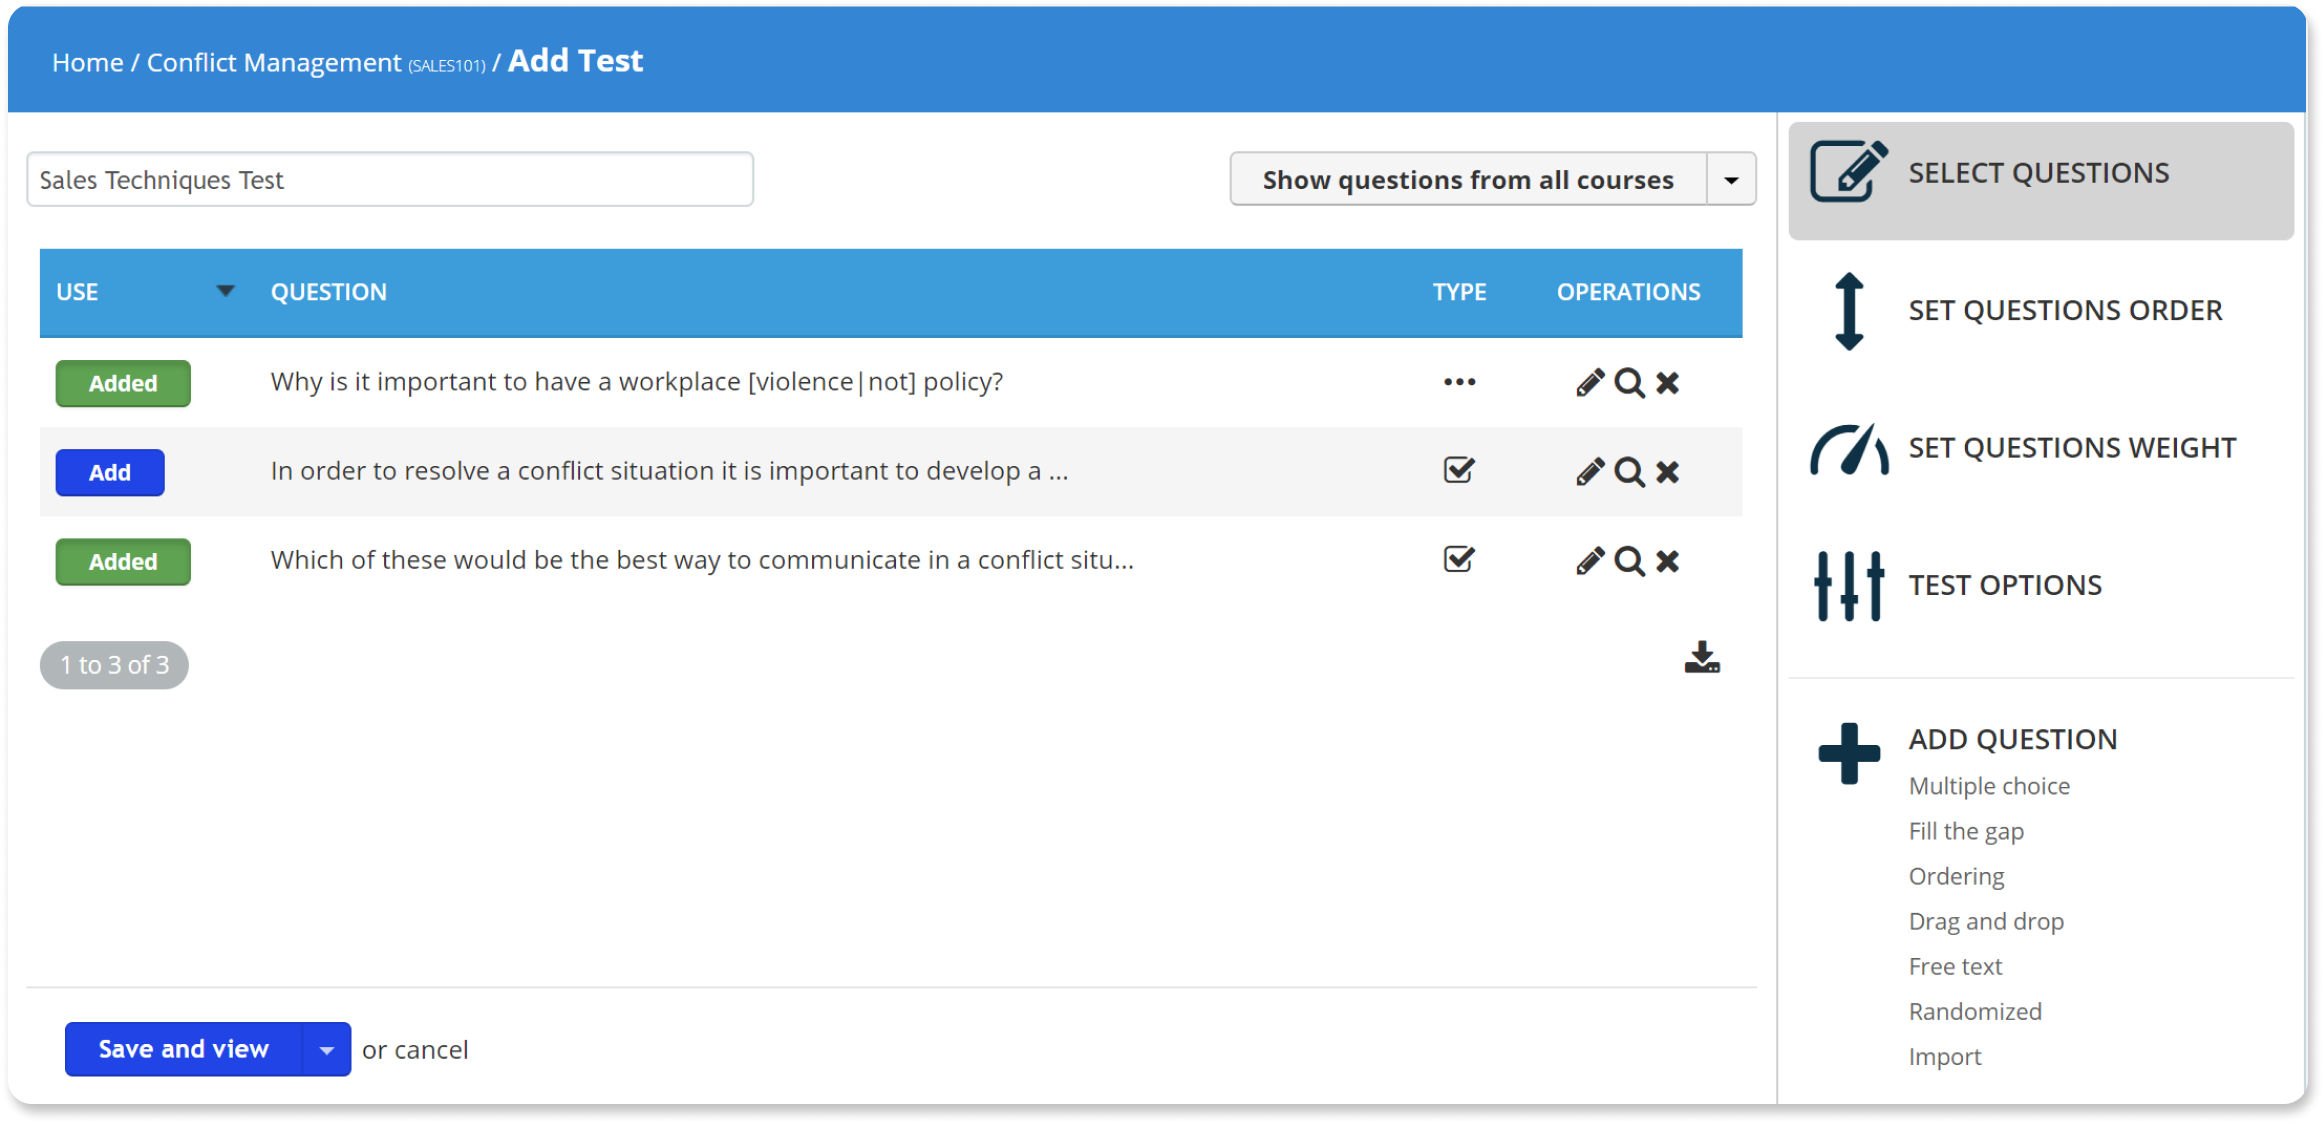
With “Add Test” you can add tests to your course, and it all starts by giving your test a name.
Following that, the sidebar on the right allows you to:
- Select questions (from a previously created question pool)
- Set the questions’ order and weight (i.e., how much they will contribute to the overall score)
- Configure test options
- Add different types of questions. Question types include: Free text, multiple-choice, fill the gap, ordering, and drag-and-drop
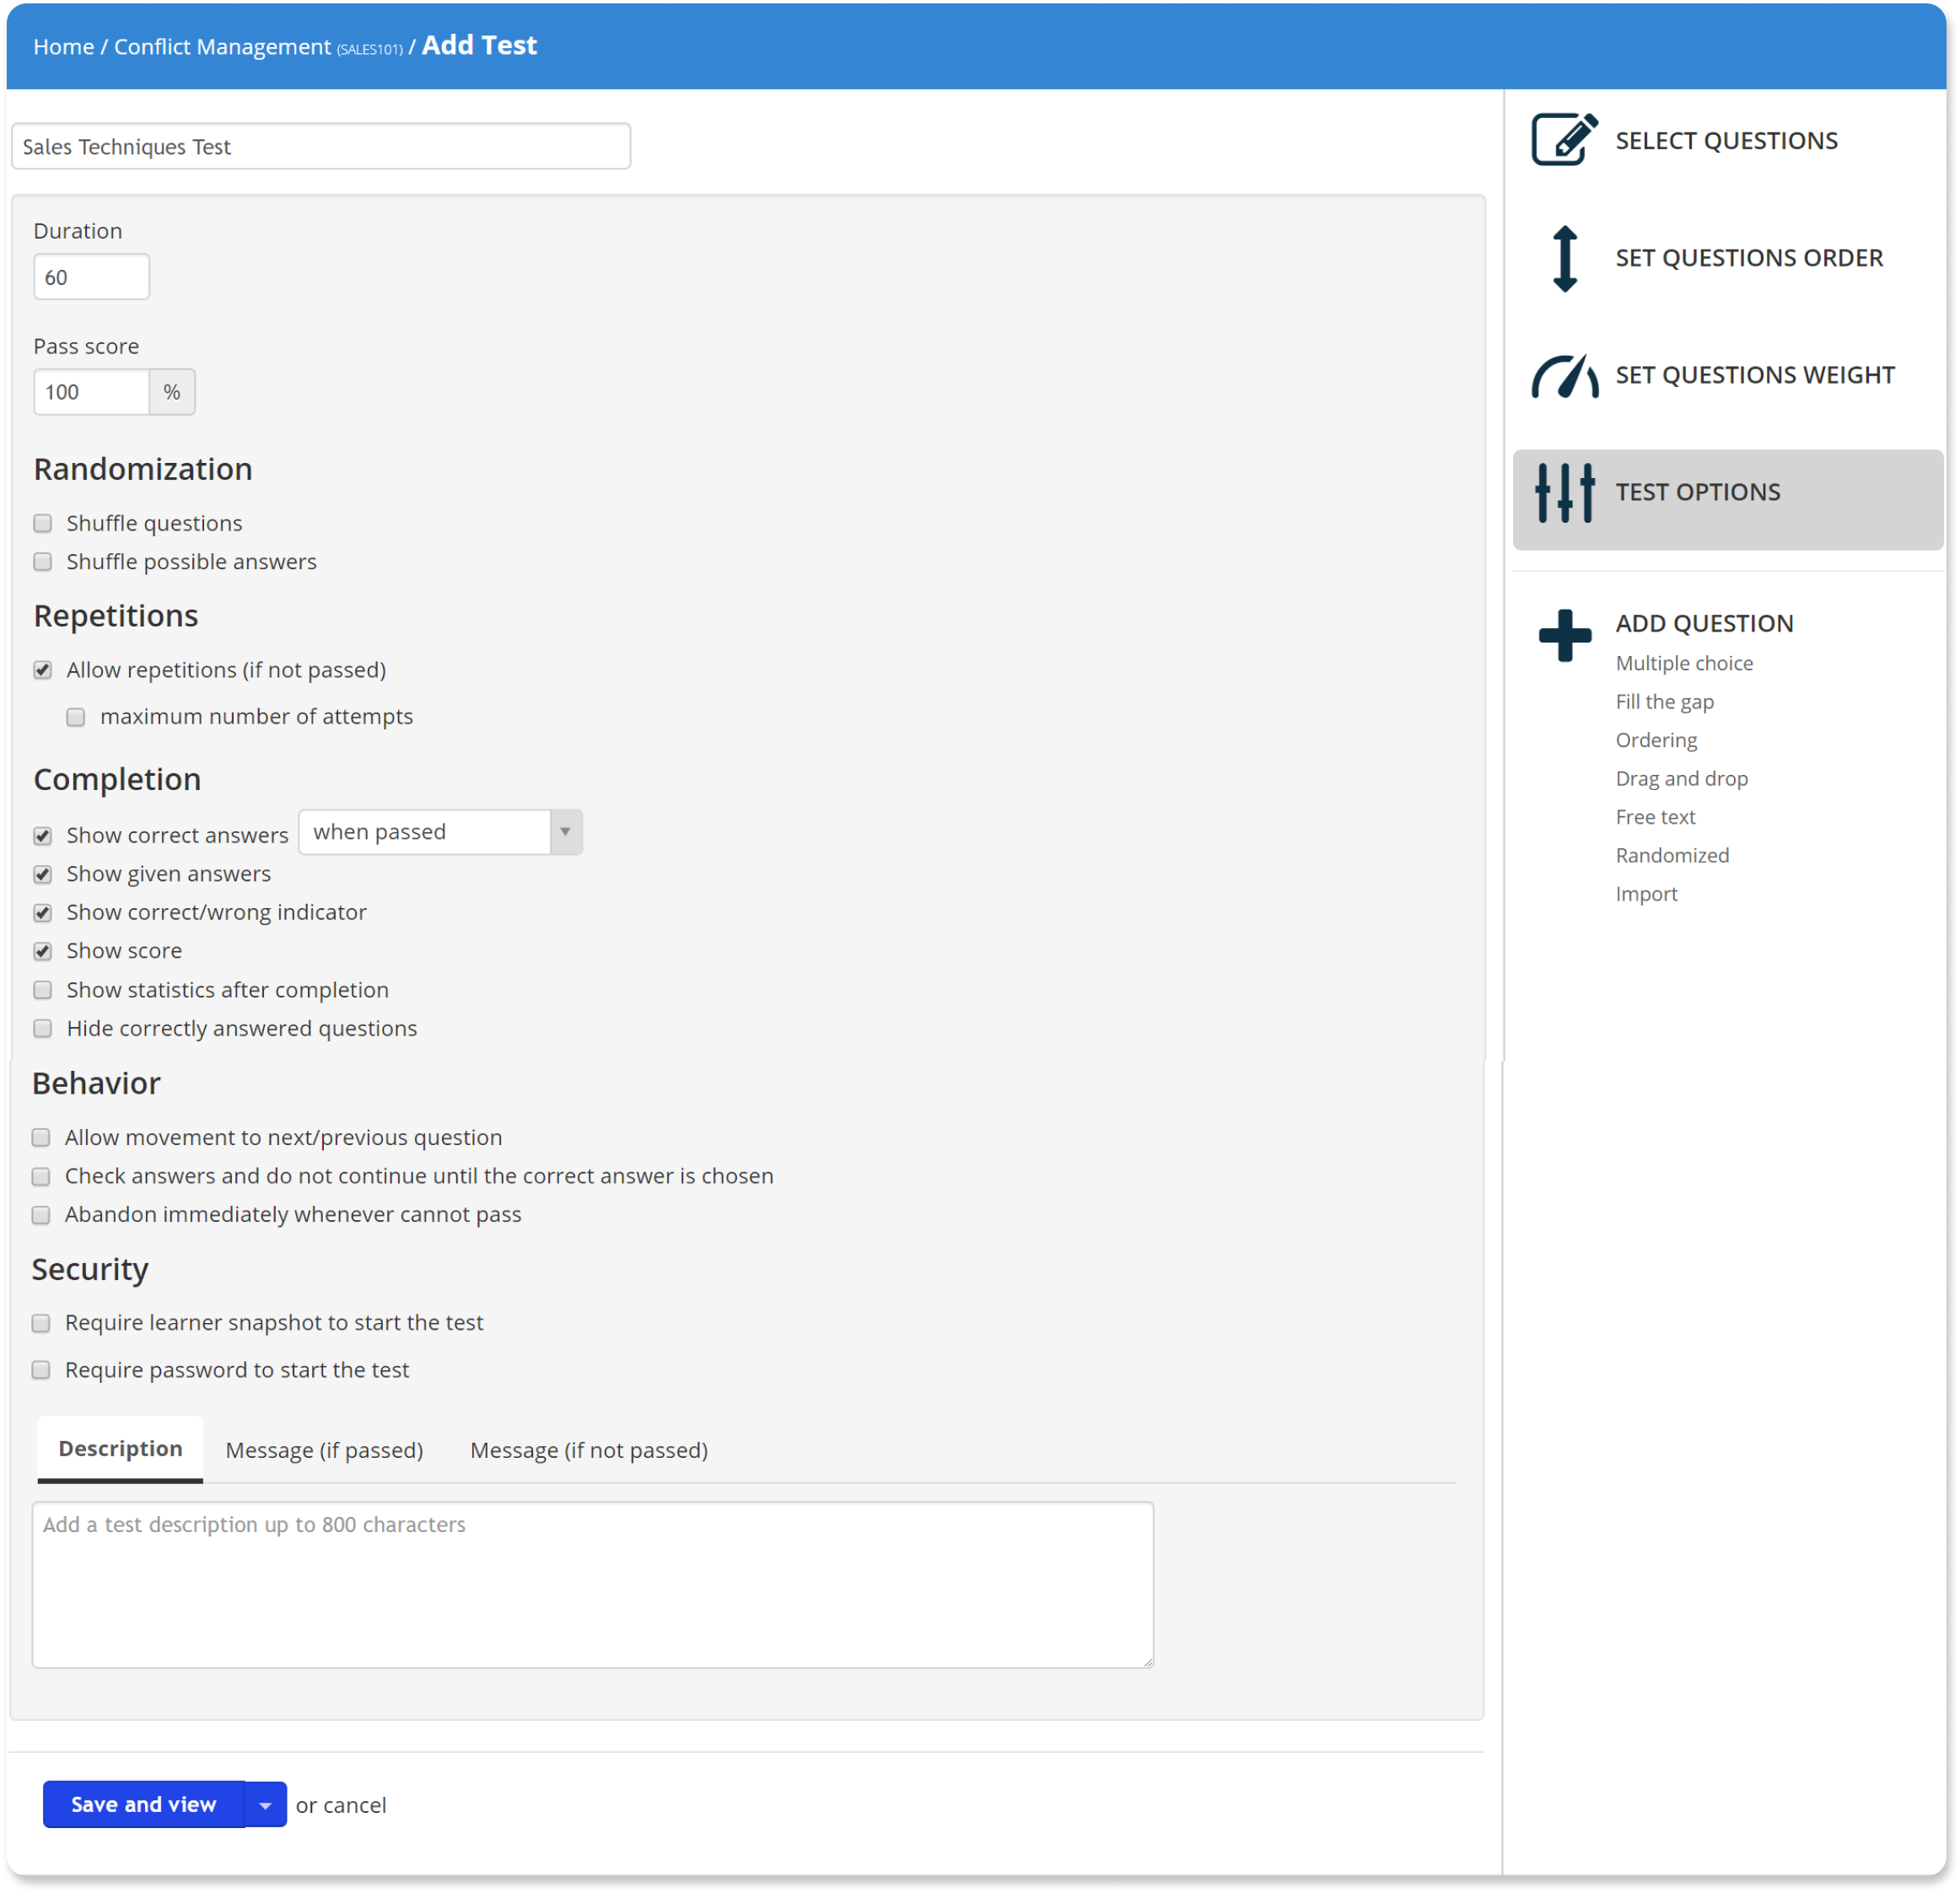
Test configuration options include:
- Test duration in minutes
- Pass score (it’s 50% by default)
- Question/answer randomization
- Allowing/disallowing or capping repetitions (if the learner fails the test)
- Whether to show correct answers, score, completion statistics and given answers
- Whether the learner should be allowed to move between questions, or continue without giving the correct answer
- Security-related option
- A short description
- Message to be shown when a user passes or fails the test
Survey
You can add a survey in TalentLMS. The way is similar (but simpler) to that for adding a test — they both boil down to creating a new unit and coming up with some questions for the learner.
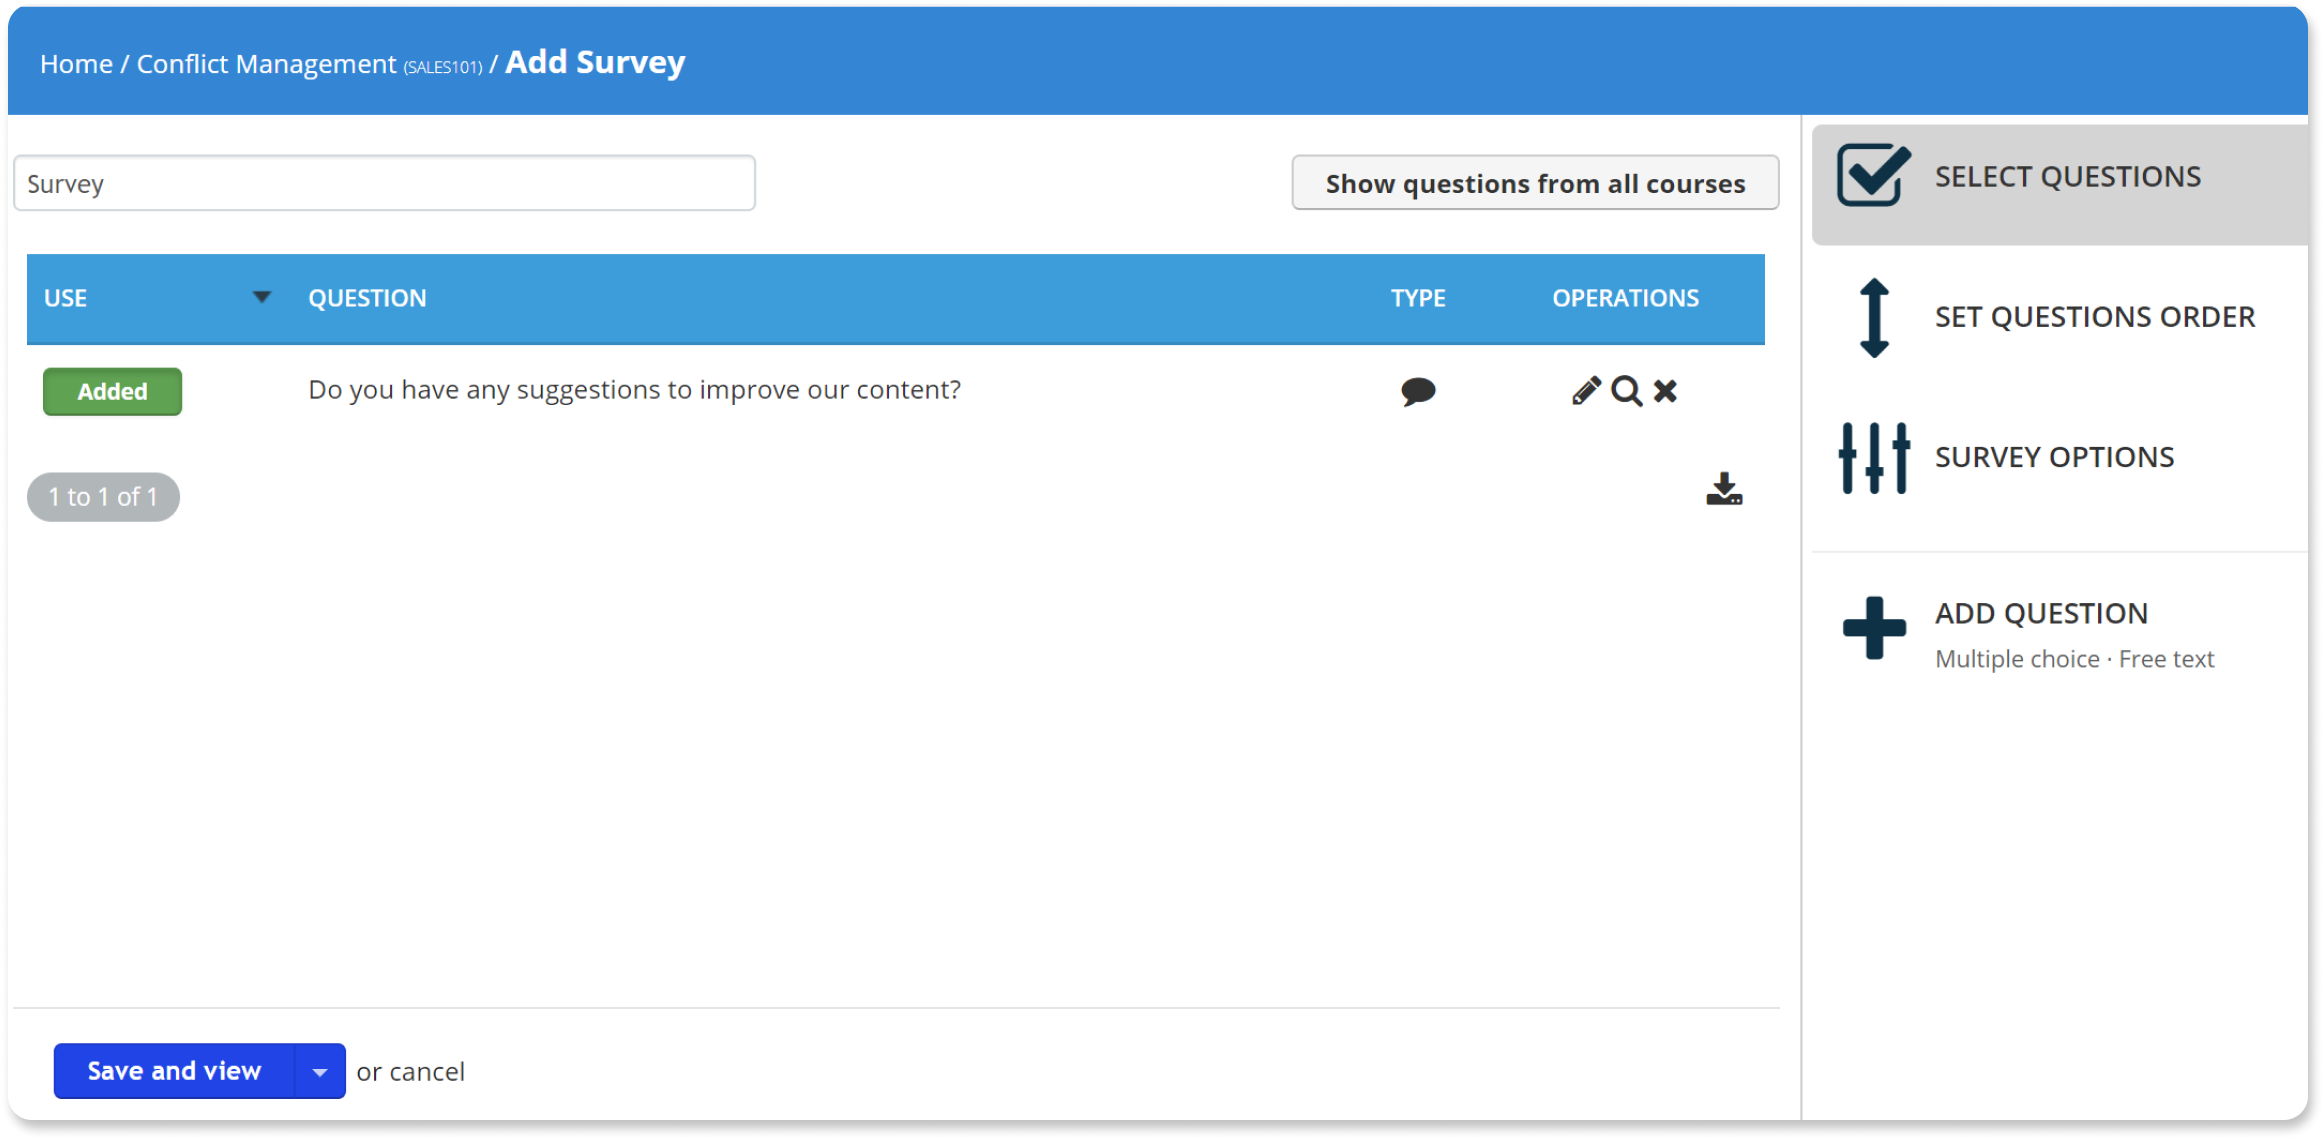
The main difference is that tests are meant to measure a learner’s understanding of a course, whereas surveys merely solicit user opinion.
Surveys offer just two options: whether to show the answers to the user upon completion, and whether to require an answer before allowing the user to continue), and only two question types: multiple-choice (like in a poll), and free-form.
Assignment
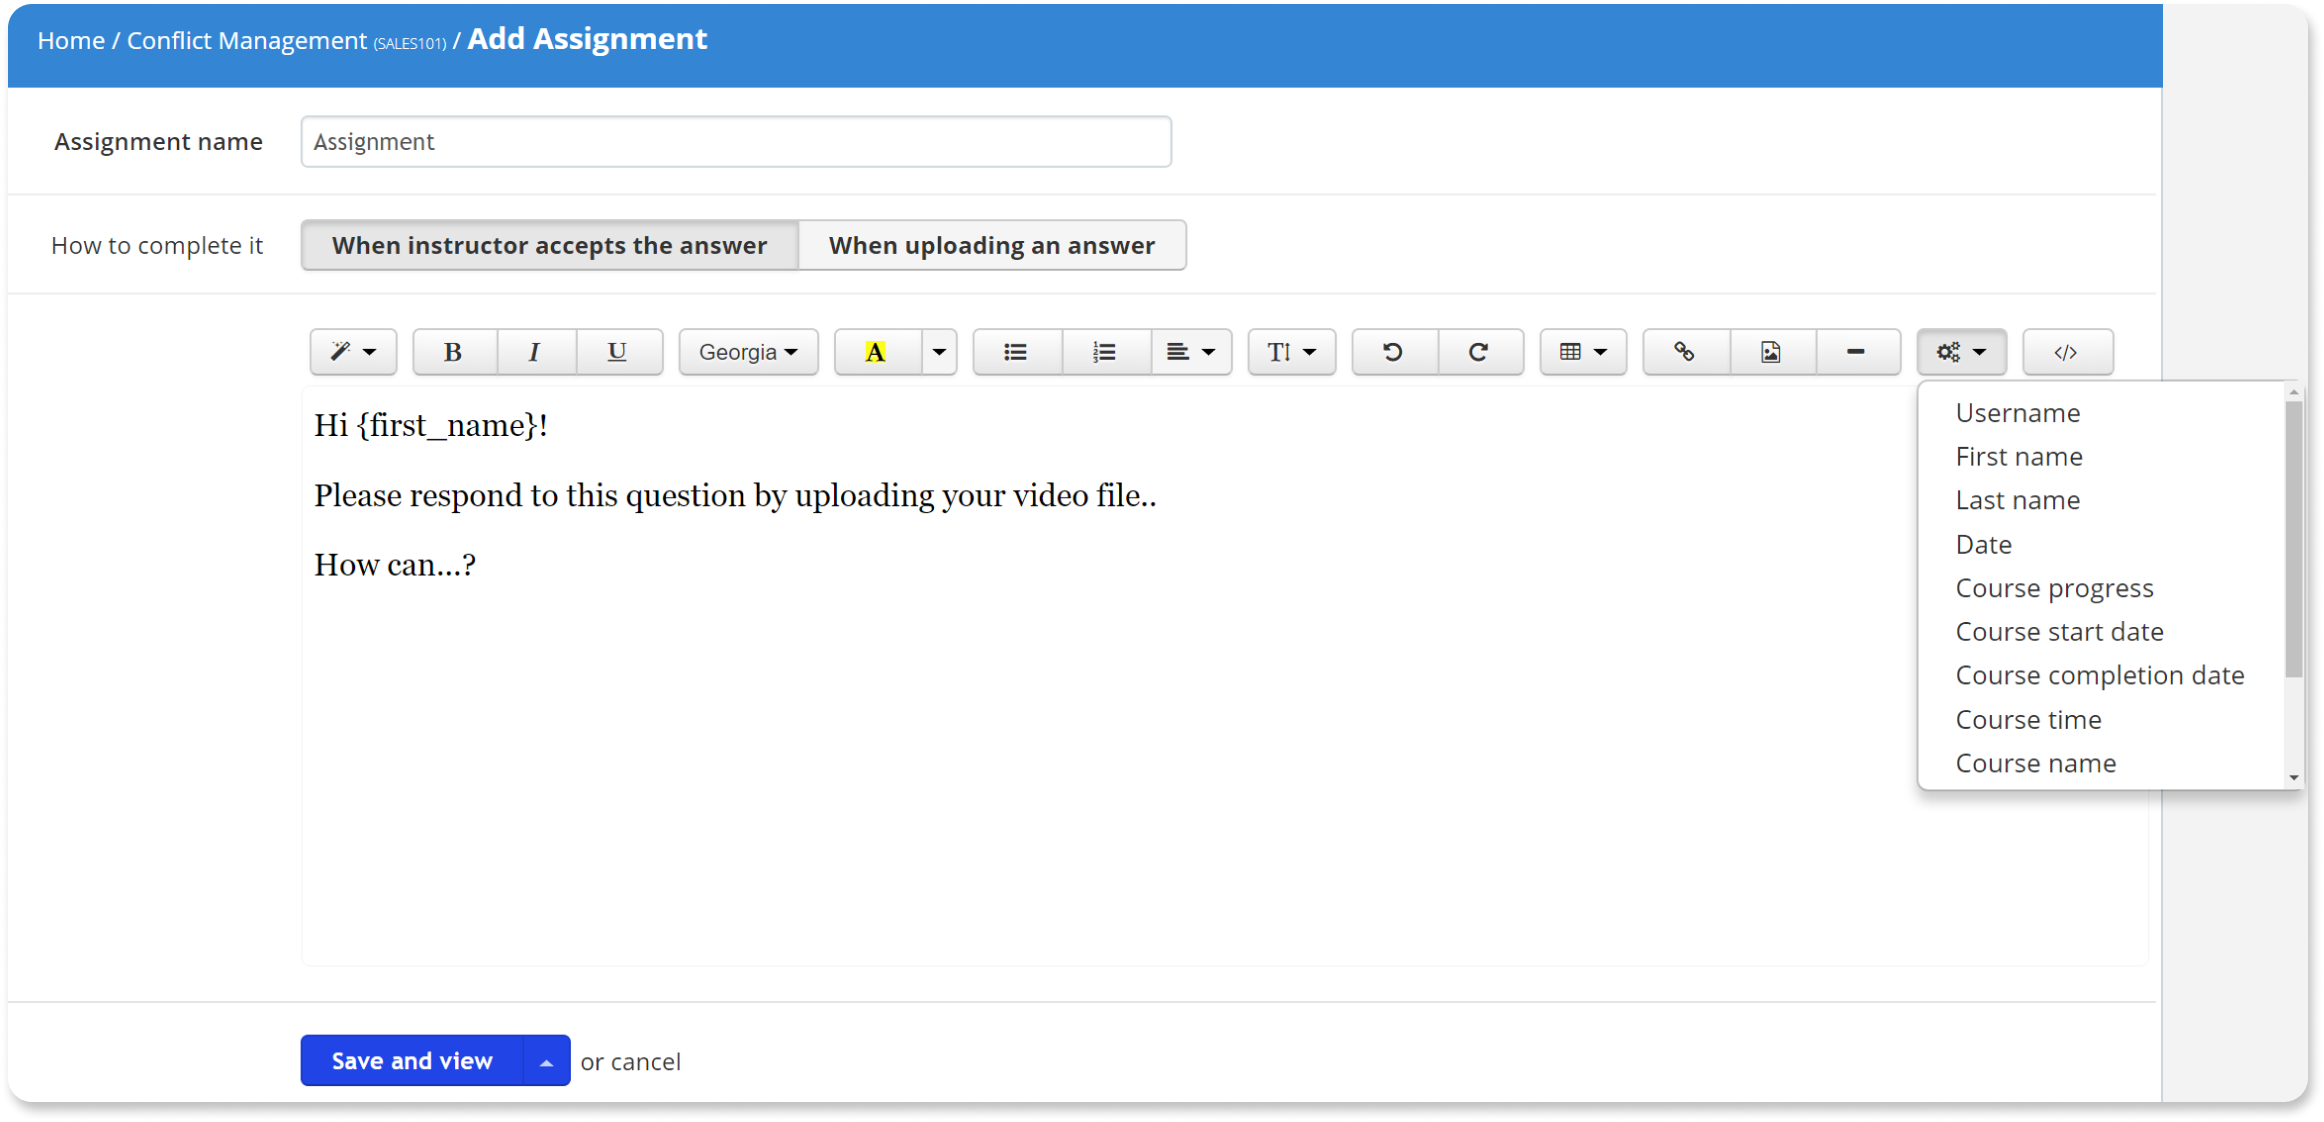
To add an assignment, you need to provide a name first and fill in the instructions to the learner.
You can then choose between two alternative completion criteria. Consider the assignment as completed:
- when the instructor accepts the answer
- or as soon as the learner submits their answer
Instructor-led training (ILT)
An ILT content entry works as an equivalent to an in-person training session.
To add a new ILT entry, click on the calendar and choose “Add Instructor-Led Training” to select a date.
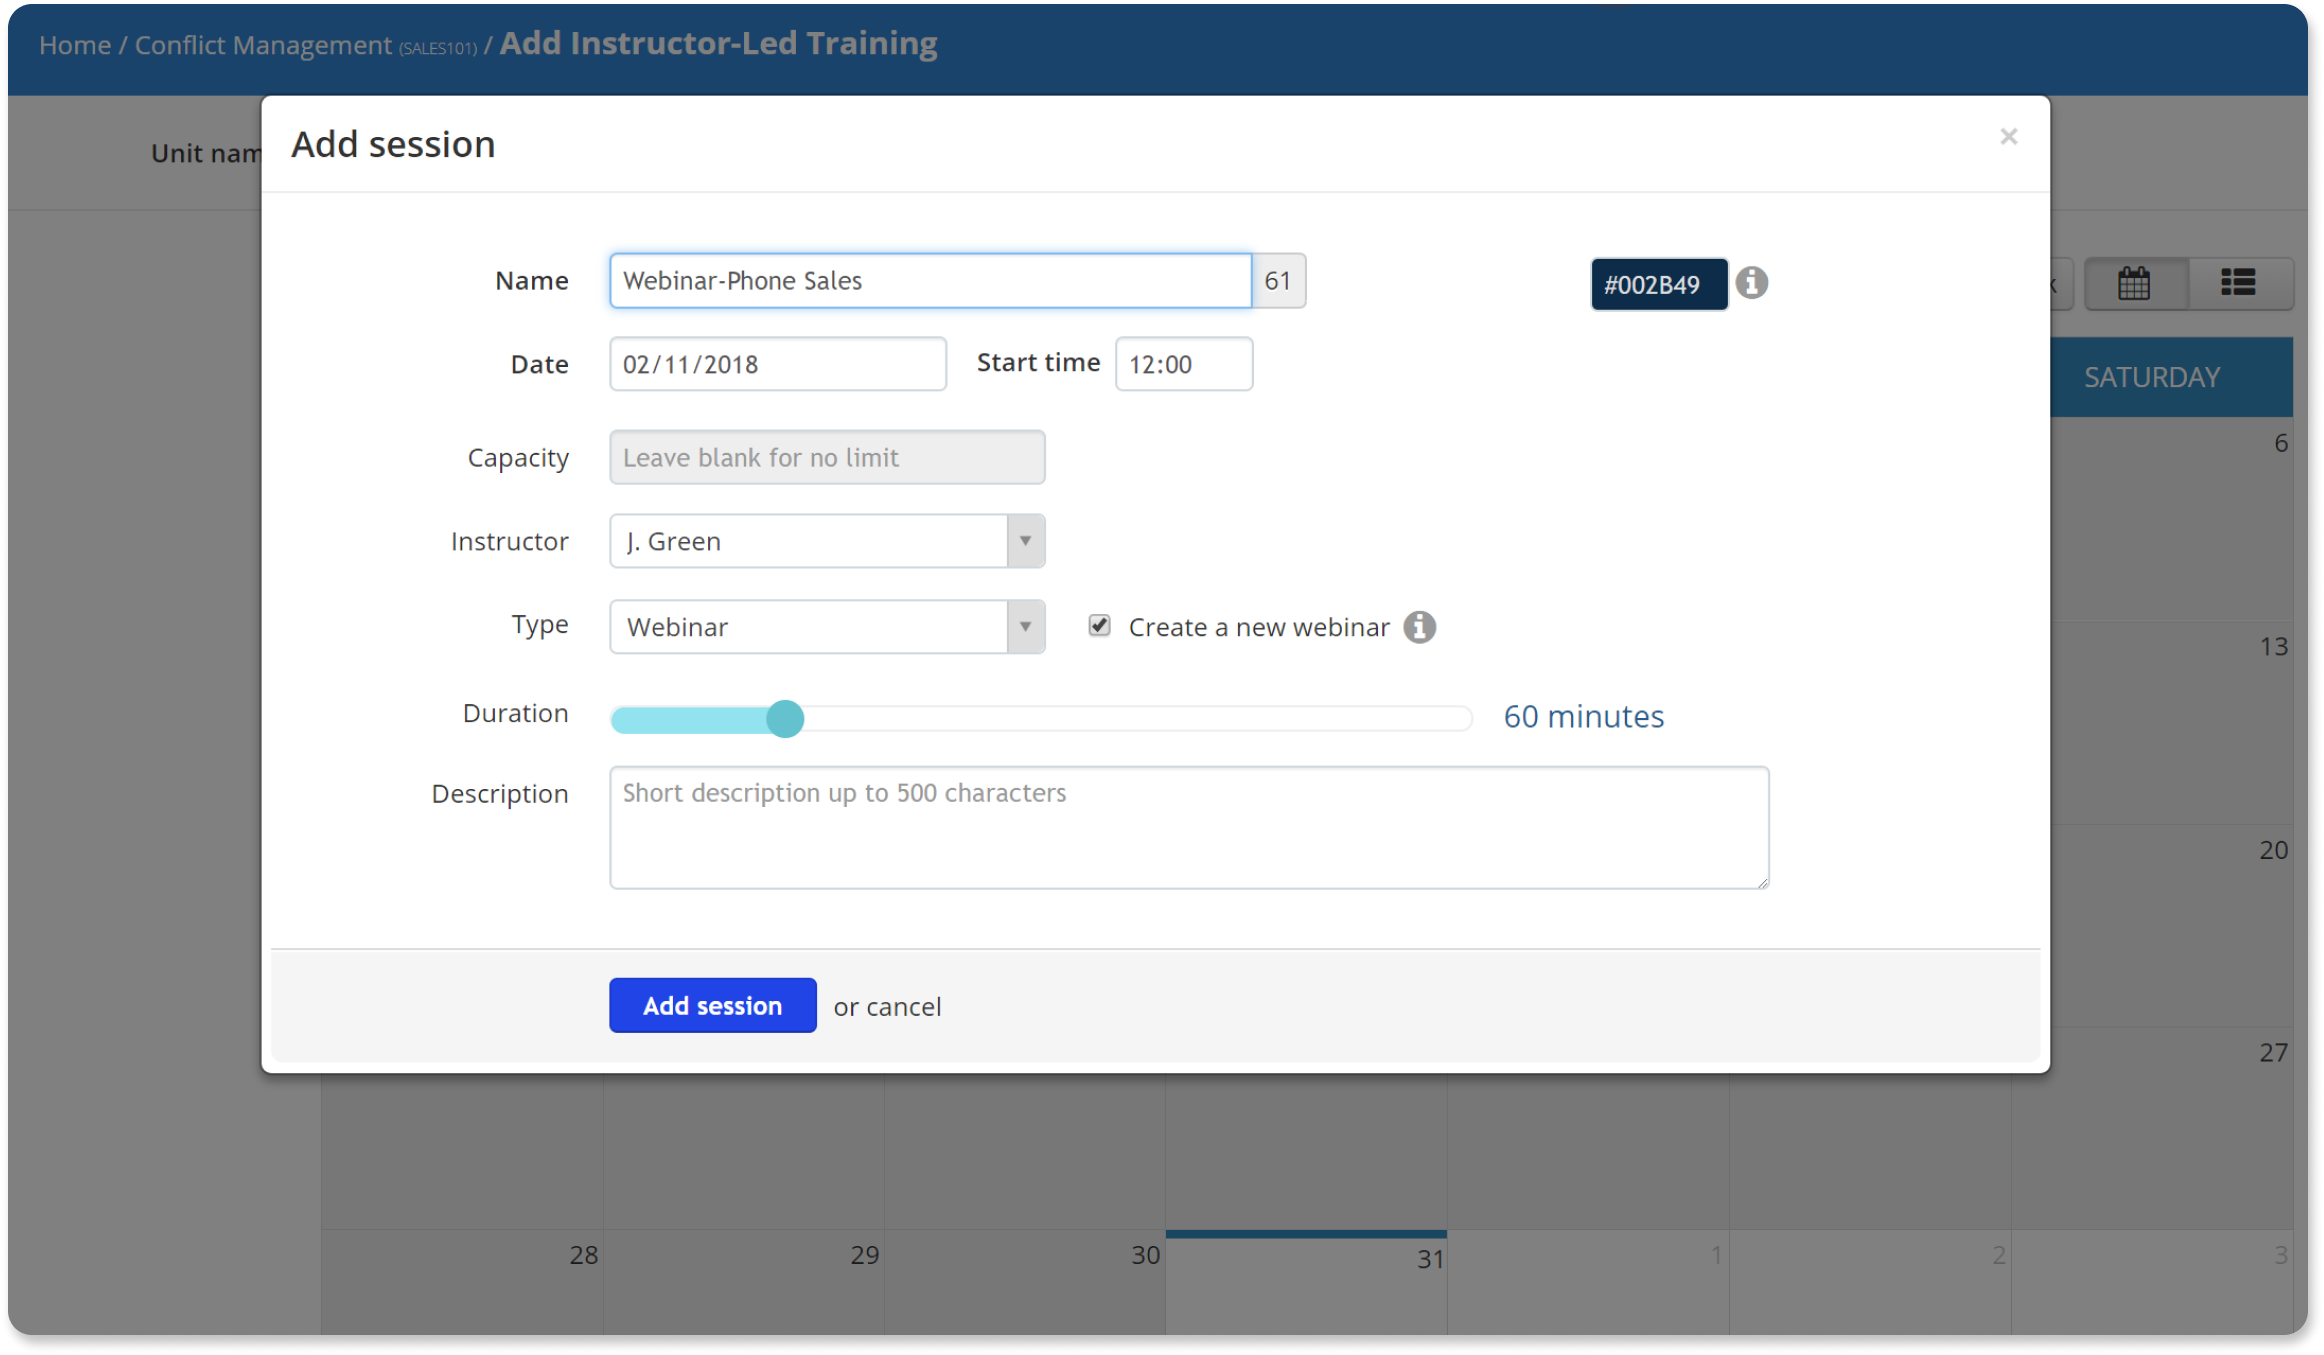
In the pop-up window, you can give your ILT session a name and description, and set its precise start time and duration.
You can choose between a webinar or a classroom-based session (and, for the latter, specify a location), set an optional capacity, and select the instructor.
Section
“Section” content is a great way to organize your courses. When you add a section, TalentLMS automatically creates a heading, and you can add as many of these “headings” as you want.
TalentLMS shows section headings as small boxes with the title inside. Click “Reorder” to place your sections at the right place on your content list.
Step #5: Share files with your learners
Click “Files” from the sidebar to get to the file library.
A course’s file library is a quick and easy way to share training books, course notes, data files, and other supplementary material with your learners.
From the file library page, you can upload new files from your computer (or import them from a URL), and view, rename, download, and delete already uploaded files.
Step #6: Configure your course
With your content added, you can now set a few course-related options. You can do that from “Rules & Path” on the sidebar.
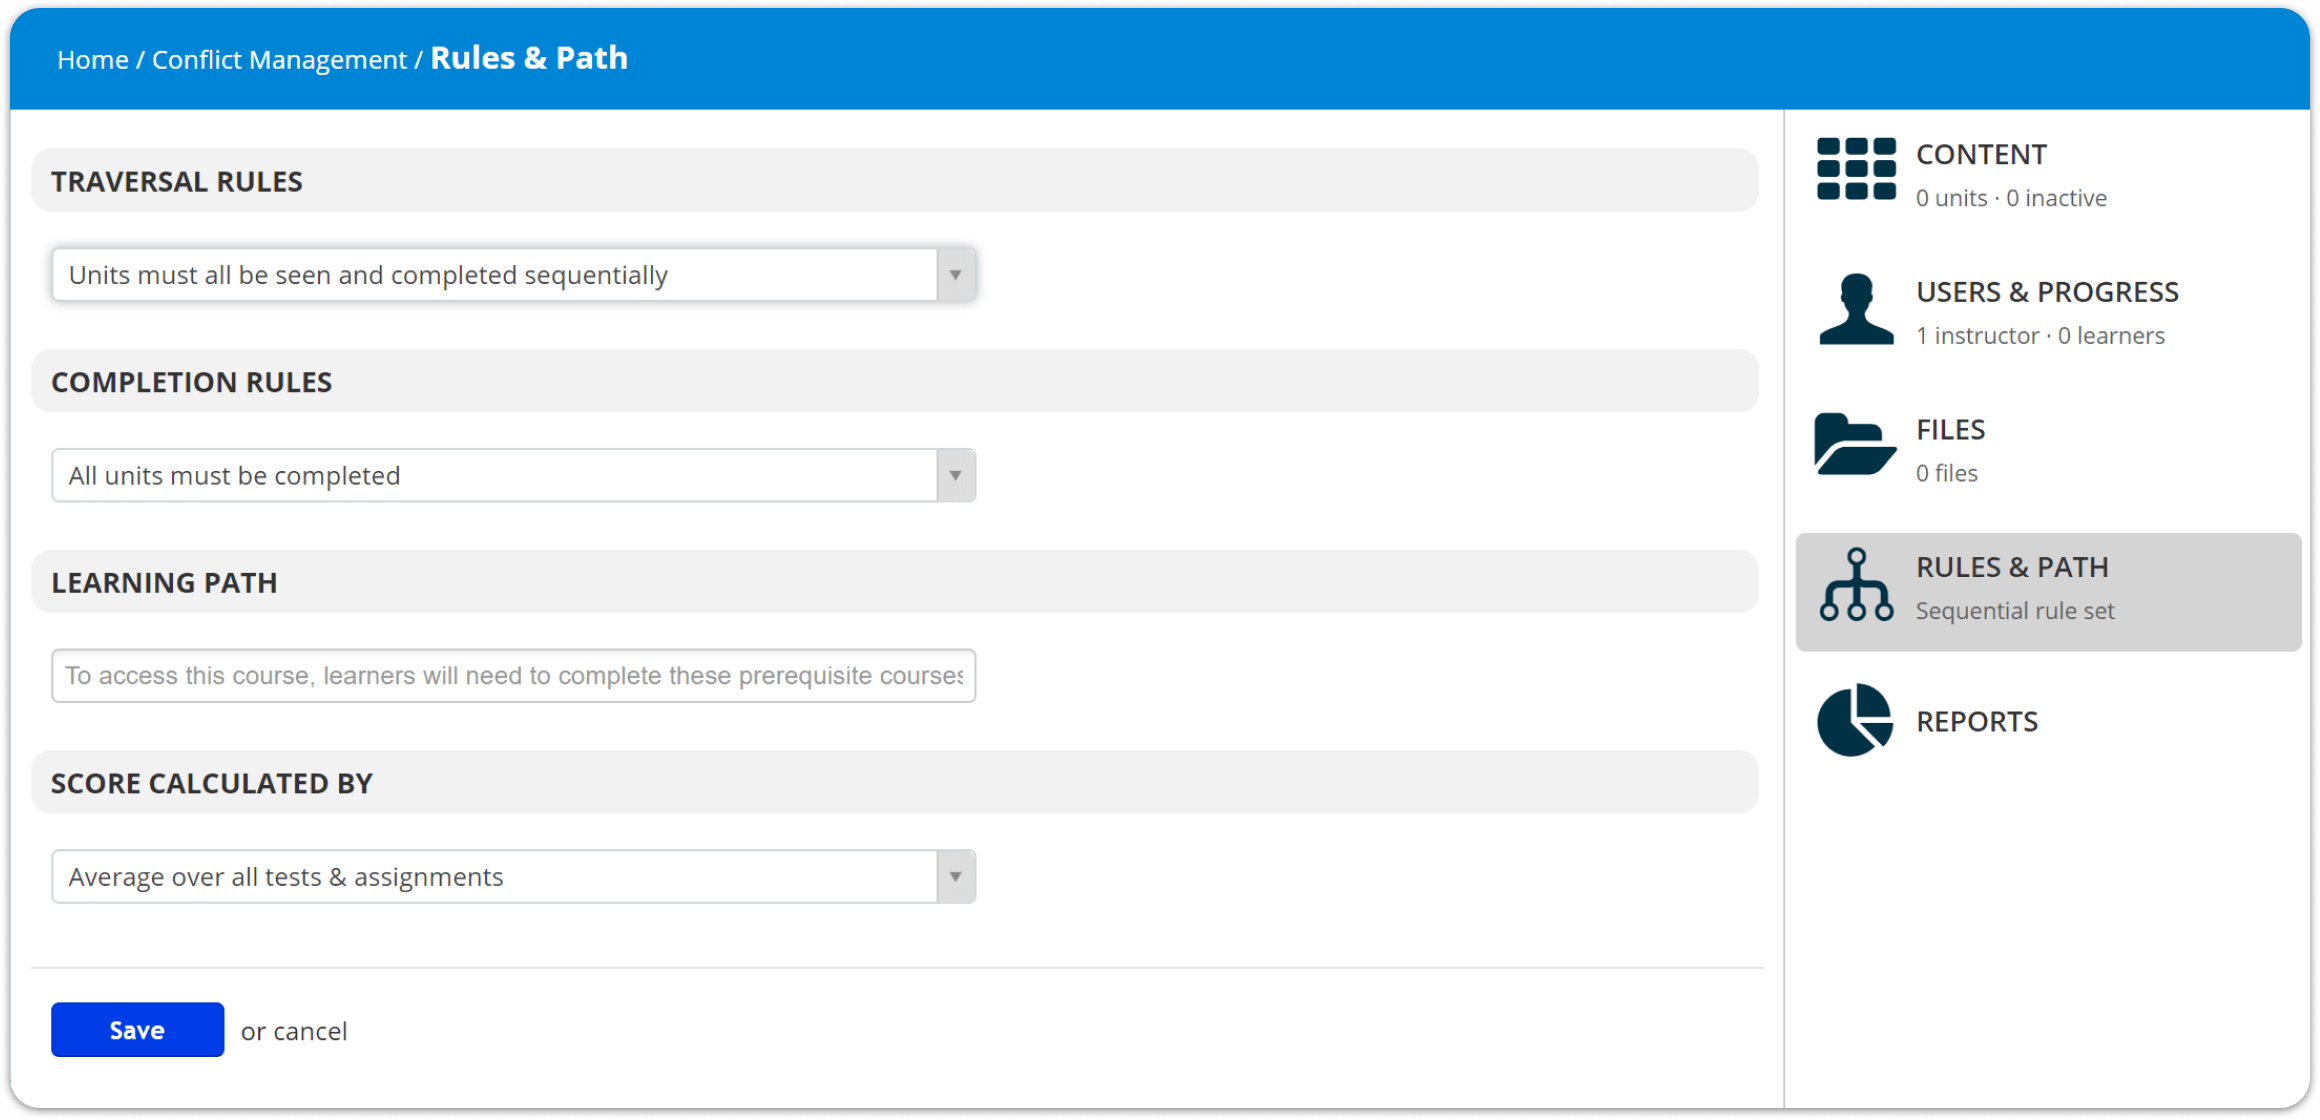
You can configure:
- How learners are allowed to navigate through the course (traversal rules): You can choose between allowing your learners free viewing of any unit, or requiring them to follow a strict, specific path
- When to mark the course as completed (completion rules): You can choose whether you want all units to be completed, specific units to be completed, a percentage of them to be completed, or a test passed as the course’s completion criterium
- The course’s learning path: You can optionally set specific courses that your learners must complete before enrolling in this course
- How TalentLMS calculates the course’s score: You can configure whether you want TalentLMS to calculate the course’s score based on the average of all tests and assignments, the average of specific tests and assignments, or the average of just tests
Step #7: Inform learners, schedule events, and check mobile compatibility
The cryptically titled “…” (misc) menu holds a few additional options.
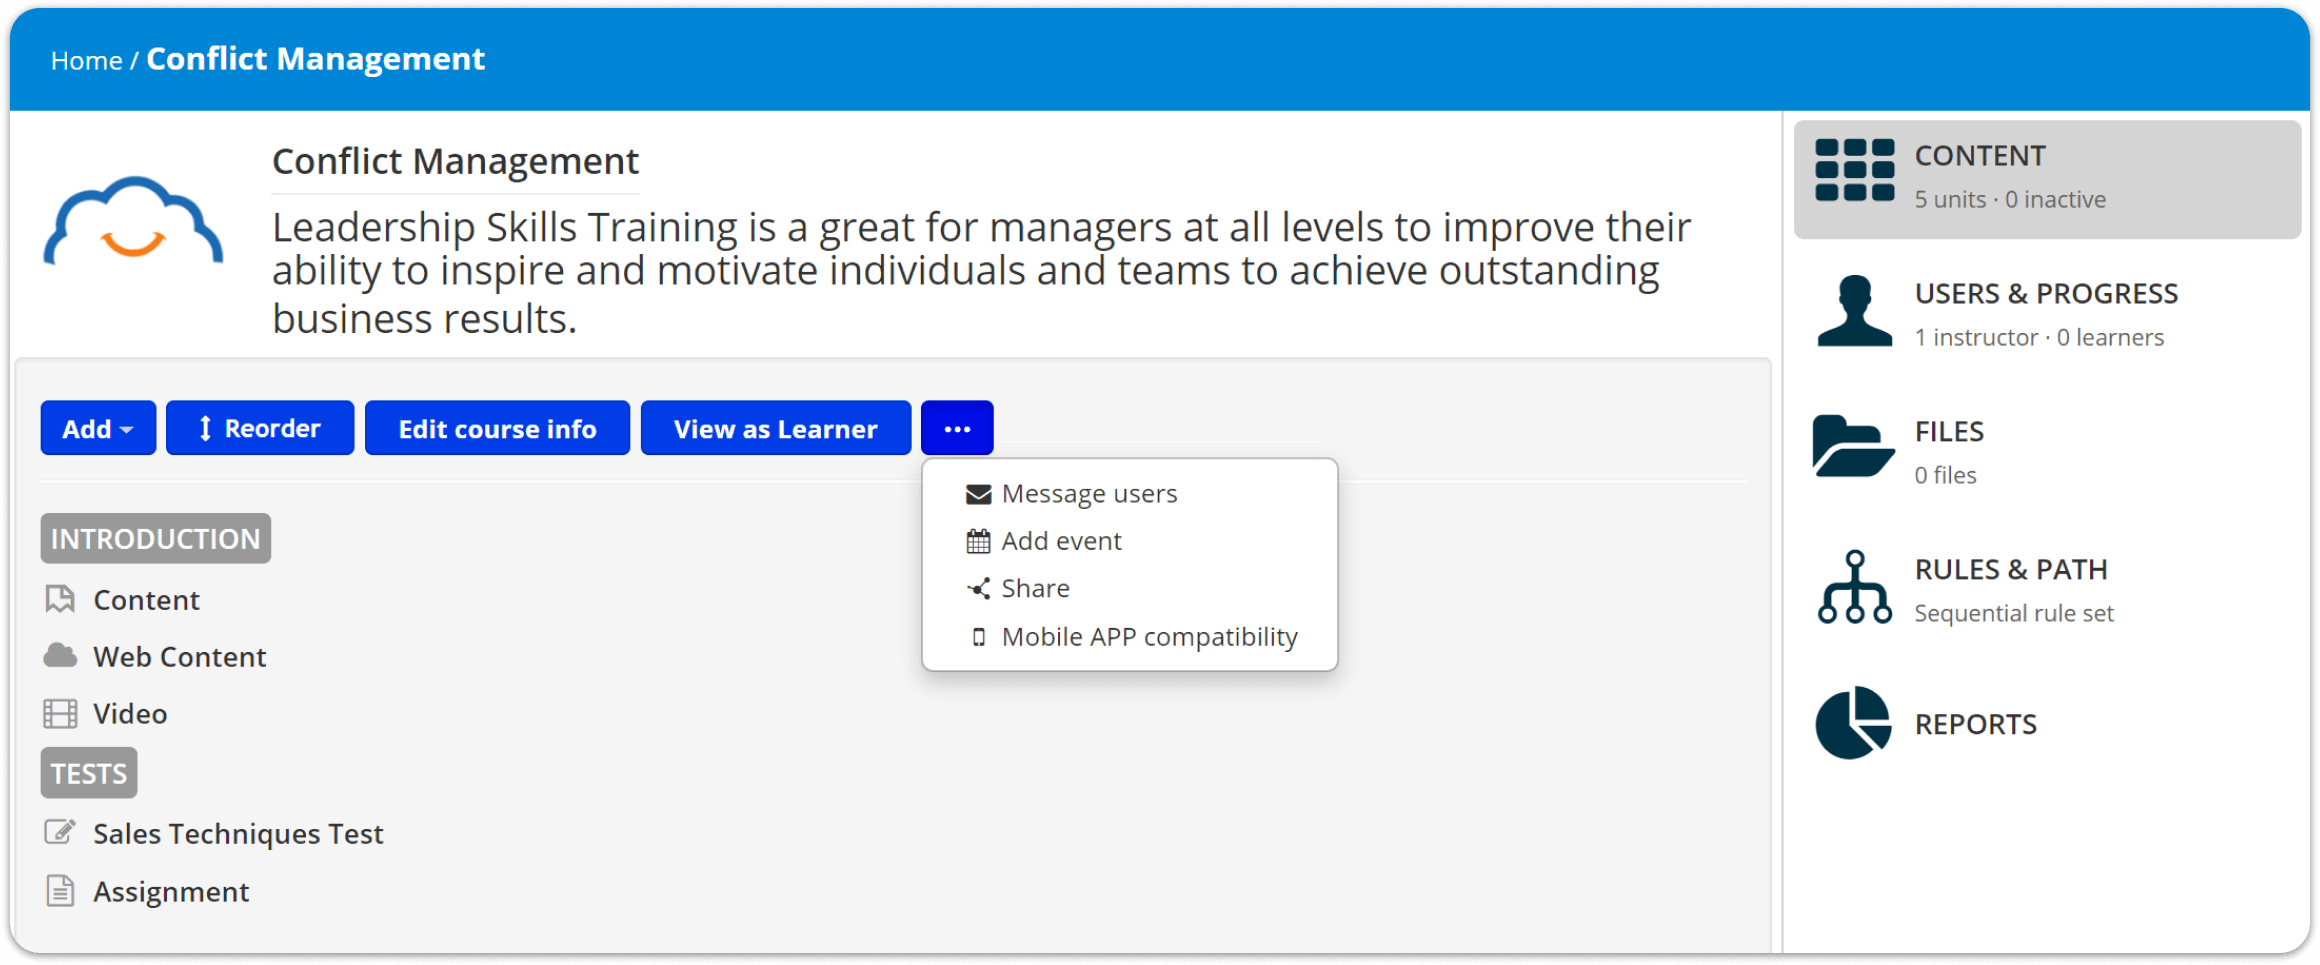
From here you can:
- Message learners enrolled in the course
- Add a calendar event set at a specific time, and make it private, visible to specific learners, or to everyone enrolled. You can even make it visible to all the users of your portal
- Get a URL that you can share to give people access to this course
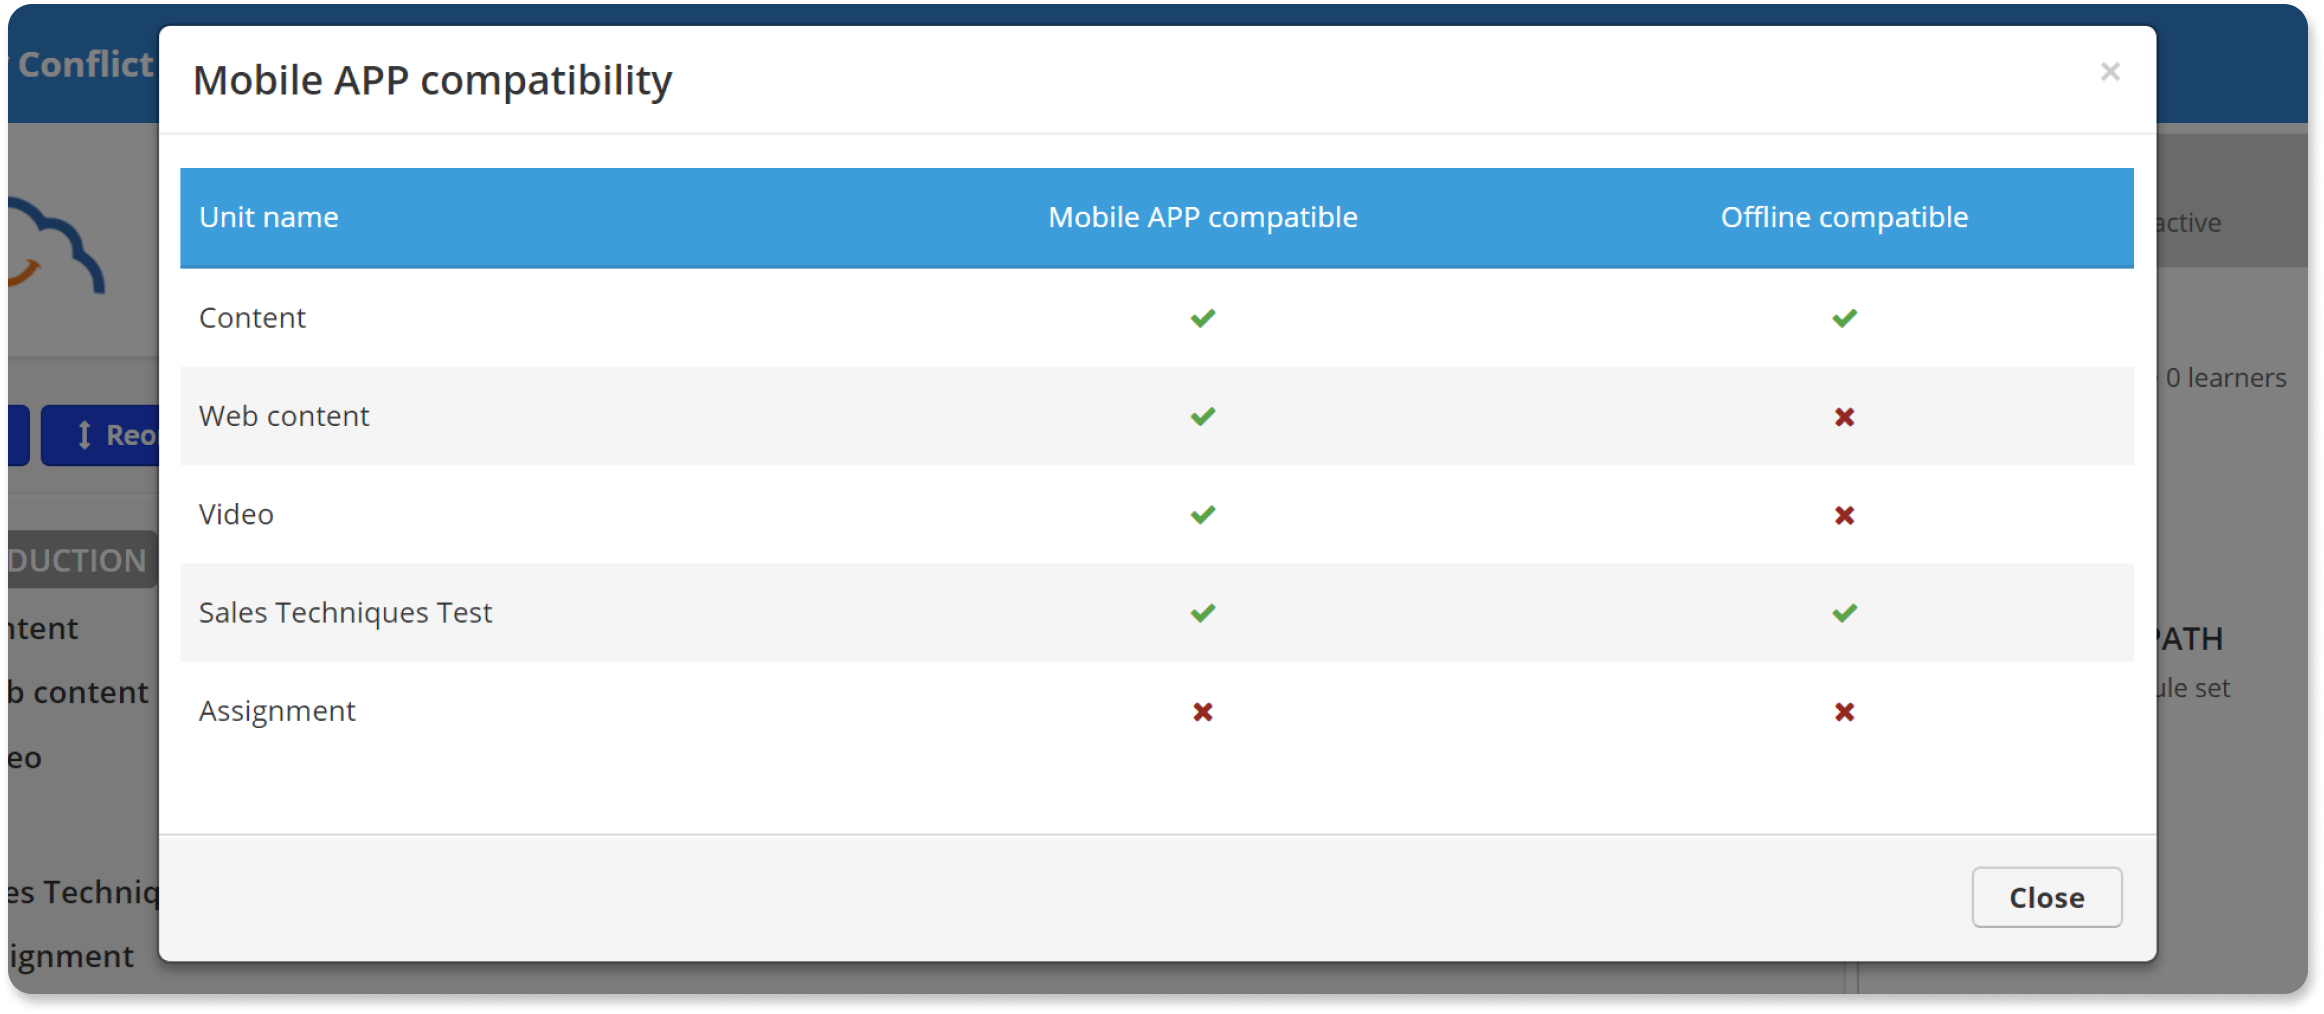
- Check the course for mobile app compatibility
This last option gives you a breakdown of all the units in your course, and whether they are compatible with mobile and offline learning.
Step #8: Finalize and check your new course
If you’re not happy with the order of your units (which is, by default, their order of creation), you can click “Reorder” and drag them to the desired order.
You can make changes to any unit by clicking on its name or hovering above its entry on the course list and clicking on one of the options that appear. This “hover” menu also lets you deactivate, delete, or delay the availability of a particular unit.
At any time during the creation of your course, you can click “View as Learner” to see the final rendered course.
This preview is handy when you first start to develop online training courses in TalentLMS, as it quickly gives you an idea of how a piece of content will appear to your learners.
Next steps
There you go! With this how-to guide, you’re now more than ready to create an online course and share it with your learners. As you can see, TalentLMS is an easy-to-use eLearning platform and comes with all the features you need to build online training courses and programs.
Originally published on: 05 Nov 2018